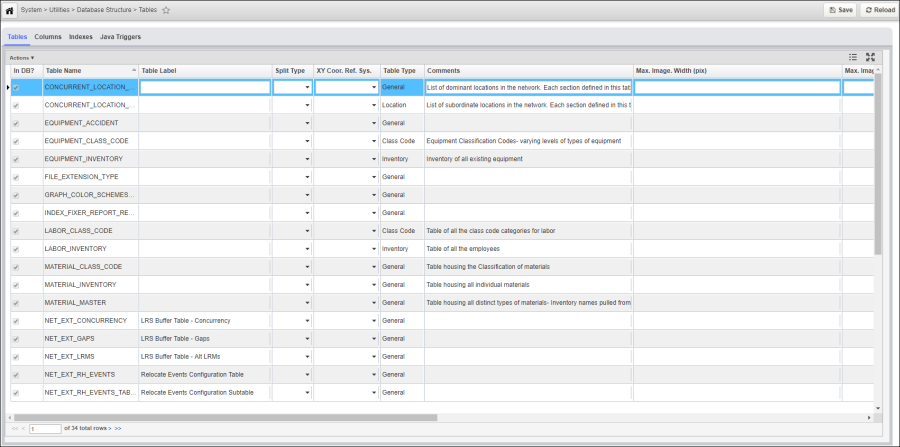
Most of the table configurations is done at Tables window, located at System > Utilities > Database Structure > Tables. The Tables window contains the following tabs:
...
- Comments: This field stores any additional information about the table.
- In DB: A check mark in this check box indicates that the table is part of the database.
Keep Change History: This check box allows you to introduce temporality into the database. When this check box is selected for a table, the application maintains previous versions of the data in the table. You may then create an "as-of date" window to display the data at a certain time in the past. (See How to Make an "As-of Date" Window for more information.)
Note Note: If you introduce temporality into a table, all related tables must also have temporality. If the table has LOC_IDENT and/or COMMENTS_ID, the system will automatically create mirror tables for these. You must manually set up temporality for any SETUP_* table having a column in the main table as well as the SETUP_NETWORK_LINES table (and any other alternate location-referencing tables). Finally, if the main table has GEOM in it, then the map also has temporality. - Max. Image Height (pix): This field sets the maximum height of images (in pixels) attached to records in the table.
- Max. Image Width (pix): This field sets the maximum width of images (in pixels) attached to records in the table.
- Max. Num. of Attach.: This field sets the maximum number of files that may be attached to a record in the table.
- Record Config Scripts: When this check box is selected, the system generates DDL (data definition language) scripts that capture all database changes that result when the Apply Changes command is executed. These scripts are stored in the SYSTEM_CONFIG_SCRIPT table.
- Split Type: This field determines how data in a record is treated when an LRS transaction causes the record to be split. If the value is set to Split Data on Split Location, then the system uses the Split Rules for the column in which the data resides. If the value is null or set to Don't Split Data on Split Location, then the system does not split the data and instead assigns the data to one of the records resulting from the LRS transaction.
- Supports Staged Editing: When this check box is selected, Staged Editing is enabled for the table.
- Table Label: This column shows the name of the table as it appears to users of the system.
- Table Name: This column shows the internal name of the table as it exists in the database; it is set by the user during the Insert process.
- Table Type: This column shows the type of table (general, class code, inventory, inventory details, location, or setup).
- XY Coord Ref Sys: This field sets the reference system used for the geometry column.
Right-click Shortcut Menu Commands
When you right-click the tab, the system displays a shortcut menu. This menu contains the following special commands that apply to the table selected in the Tables tab:
Apply Changes: This command modifies the table structure and/or indexes in the database. After you make changes in the Columns tab or Indexes tab, select this command to implement the changes in the database.
Note Note: Any additions or modifications to the Comments column are sent to the Oracle system table that stores comments when you execute this command. Delete: This command deletes all appropriate records form "metadata" tables (SETUP_TABLES, SETUP_TABLE_COLUMNS, etc.). After deletion, you will also need to delete the menu item for the table in the Menus window.
Note Note: This command is not available for inventory and class code tables; to delete these types of tables, delete the name of the table from the Table Name column of the Asset Type window. - Import Table Data: This command opens the Import Config window, which is used for configuring the routine that will import data into the selected table. See Import Config Window for more information.
- Insert: This command provides the ability to include an already existing table in the Tables window or create a new table. When you select this command, the system displays a dialog box. This dialog box provides two radio buttons for selecting whether the table is new or already exists in the database; a text field to enter the name of the table; and a drop-down list to select the type of table. The following are the available types of tables that may be selected:
- Location: This type corresponds to tables with location information.
- General: This type corresponds to all tables not covered by the other two.
- Setup: This type corresponds to list tables.
Note Note: Inventory tables are omitted from this list because they are created in the Asset Type window. See Create a Table with Location Data for more detailed instructions on creating a data table with location information; see Create a List Table for more detailed instructions on creating a table that will provide list data. - Make Window: This command creates a window for the table. See Make a Data or List Window for further instructions on using this command.
- Refresh from Database: This command essentially makes the window associated with the table match how the table appears in the database. It removes the columns from the window that are not in the table (that is, are in the metadata buffer table but not in the database table itself); updates the column definitions in the window to what is defined for the table; adds columns to the window that are defined in the database; and resolves any differences in primary keys and indexes (it deletes all and re-inserts what is defined for the table). This command is typically used when changes are made to a table, but not yet committed to the database (via the Apply Changes command), and you do not want to keep the changes (and instead revert to the original version of the table).
...
LRS Retire Type: This field specifies when an LRS Transaction retires a route, what will happen to the associated events / records on that route. This is explained in detail below.
When an LRS Transaction (either an internal LRS Transaction or through an LRS Interface) realigns or retires part of a route, by default, the events on the old parts of the routes will be considered deleted. In AgileAssets system, the LRS Gateway will delete records where the linear location is retired (when LOC_IDENT column is part of the unique index on the table – which is the typical configuration for tables that stores location data).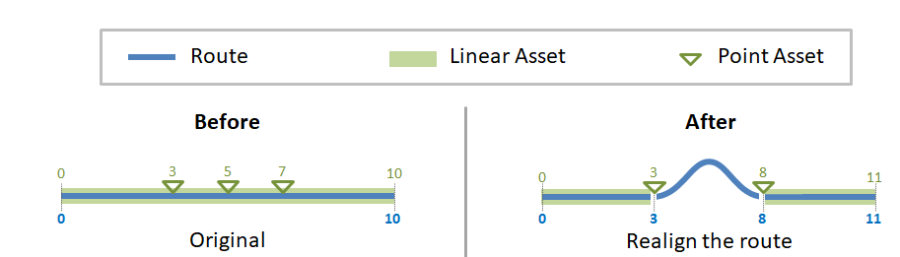
In many cases for Pavement Analyst module it is valid to delete the record with the linear location because this data is no longer relevant as the route has changed e.g. pavement condition data.
But for Maintenance Manager or Structure Manager modules, normally no assets should be deleted. Instead, the status of the asset is set to an inactive asset status to a corresponding value, e.g. Removal, Abandoned. This is because assets have many records linked to them e.g. work orders, inspections, etc.
If not configured correctly the default LRS retire behavior will for point assets delete the record in the XX_INVENTORY table that LRS gateway says is retired - this can lead to data loss if not configured correctly.
There are 3 options in LRS Retire Type field:- Delete Record (Default)
- Record is deleted from SETUP_LOC_IDENT for specific LOC_IDENT retired by LRS Gateway
- If table (identified in SOURSE_TABLE column in SETUP_LOC_IDENT table) has unique index on LOC_IDENT column - the record is deleted for LOC_IDENT retired by LRS Gateway
- If no option is selected for this field, this behavior will be applied.
- Clear LRS Location
- Record is deleted from SETUP_LOC_IDENT for specific LOC_IDENT retired by LRS Gateway
- The LOC_IDENT is set to null in table (identified in SOURSE_TABLE column in SETUP_LOC_IDENT table) for specific LOC_IDENT retired by LRS Gateway
- Set asset status and clear LRS location
- Record is deleted from SETUP_LOC_IDENT for specific LOC_IDENT retired by LRS Gateway
- For inventory tables (point): Asset status field XX_STATUS_ID is set to status specified in SETUP_ASSET_TYPE table LRS_RETIRE_ASSET_STATUS_ID column for specific LOC_IDENT retired by LRS Gateway. This status link to the specific status on SETUP_ASSET_STATUS that identifies the LRS retire status.
- For INVEN_DET tables (lines): The record in the INVEN_DET table is deleted for specific LOC_IDENT retired by LRS Gateway. If the last record is deleted in the XX_INVEN_DET table for a corresponding XX_INVENTORY table, the XX_INVENTORY table's asset status field XX_STATUS_ID is set to status specified in SETUP_ASSET_TYPE table LRS_RETIRE_ASSET_STATUS_ID column for specific LOC_IDENT retired by LRS Gateway
- This option is only available for Inventory and Inventory Details type tables
Note Note: The "Set asset status and clear LRS location" option is only available for "Inventory" and "Inventory Details" Table Types. This option has one additional configuration step and that is to set the specific asset status to use for a specific asset type when an LRS retire happens. This is configured on the relevant asset type in the System > Settings > Asset Inventory Settings > Asset Type window's LRS Retire Status field. The field will display asset statuses for the select asset. - Delete Record (Default)
Right-click Shortcut Menu Commands
When you right-click the tab, the system displays a shortcut menu. This menu contains the following special commands that apply to the table selected in the Tables tab:
Apply Changes: This command modifies the table structure and/or indexes in the database. After you make changes in the Columns tab or Indexes tab, select this command to implement the changes in the database.
Note Note: Any additions or modifications to the Comments column are sent to the Oracle system table that stores comments when you execute this command. Delete: This command deletes all appropriate records form "metadata" tables (SETUP_TABLES, SETUP_TABLE_COLUMNS, etc.). After deletion, you will also need to delete the menu item for the table in the Menus window.
Note Note: This command is not available for inventory and class code tables; to delete these types of tables, delete the name of the table from the Table Name column of the Asset Type window. - Import Table Data: This command opens the Import Config window, which is used for configuring the routine that will import data into the selected table. See Import Config Window for more information.
- Insert: This command provides the ability to include an already existing table in the Tables window or create a new table. When you select this command, the system displays a dialog box. This dialog box provides two radio buttons for selecting whether the table is new or already exists in the database; a text field to enter the name of the table; and a drop-down list to select the type of table. The following are the available types of tables that may be selected:
- Location: This type corresponds to tables with location information.
- General: This type corresponds to all tables not covered by the other two.
- Setup: This type corresponds to list tables.
Note Note: Inventory tables are omitted from this list because they are created in the Asset Type window. See Create Location Tables for more detailed instructions on creating a data table with location information; see Create a Setup (List) Table for more detailed instructions on creating a table that will provide list data. - Make Window: This command creates a window for the table. See Make a Data or List Window for further instructions on using this command.
- Refresh from Database: This command essentially makes the window associated with the table match how the table appears in the database. It removes the columns from the window that are not in the table (that is, are in the metadata buffer table but not in the database table itself); updates the column definitions in the window to what is defined for the table; adds columns to the window that are defined in the database; and resolves any differences in primary keys and indexes (it deletes all and re-inserts what is defined for the table). This command is typically used when changes are made to a table, but not yet committed to the database (via the Apply Changes command), and you do not want to keep the changes (and instead revert to the original version of the table).
| Anchor | ||||
|---|---|---|---|---|
|
| Note |
|---|
| Note: When a column is configured as a String and set to a size of zero, it will be interpreted as a CLOB (character large object). |
The Columns tab shows the columns in the table selected in the Tables tab. When the Apply Changes right-click command in the Tables tab is executed, it updates the table structure using the column definitions from this tab.
Columns in the Columns Tab
The columns in this tab provide the following information:
Audit: When the check box in this column is selected, the system keeps a change history log for the data in the associated column. You access this log by clicking the Audit Link column's value in the appropriate data entry window.
Note Note: Auditing only works on tables that have a single-column unique index. - Column ID — This is the internal name that identifies the column.
- Column Label — This is the name of the column as seen in the application.
- View Type — This column identifies the type of column. This value controls how the column is configured in the Oracle table as well as how it is displayed in data windows. Valid values are: B - Color; C - Check Box; D - Date; G - Geometry; H - Big List; R - Number; S - String; and T - List.
- Required — When the check box in this column is checked, data must appear in the column. The system will also prefix the column name with an asterisk
 to denote that it is required.
 - Update Source – This field is used in Update Target Table function. When filled, it indicates that this row in the Columns pane is a calculated column and is the SELECT SQL statement that performs that calculation. When this field is filled, an "Update Target Table" right-click function will be available in the corresponding window to allow user to update the table using the definition query stored here. This function is mostly used in Pavement Analyst.
- Where Clause – This field, when filled, is the WHERE clause portion of the SELECT SQL provided in the Update Source field. This field is ignored whenever the Update Source field is blank.
- Update Order – This field configures the order in which calculated columns are calculated. This order is important whenever one calculated column is based upon the results of another; in this case, the first column's Update Order must be smaller than the second's (e.g., Update Order 10 is calculated before Update Order 20). This field is ignored whenever the Update Source field is blank.
- The definition of columns includes the option of using SQL statements to update the data in the column. These statements are placed in the Update Source and Where Clause fields. For the data to be successfully and correctly updated, you must complete these fields properly.
- The general form for the SQL statement is:
SELECT ( update_source ) AS column_name FROM table_name A WHERE where_clause - Such that:
- The SELECT statement is legal and when run without the where_clause selects one and only one record for every record in the table_name.
- The table_name is the appropriate table being updated (as identified in the currently selected record in the top pane of the window you're using).
- The column_name is the appropriate column being updated (as identified in the currently selected record in the Columns pane of the window you're using).
- The update_source is the text in the UPDATE_SOURCE field. If filled, then
...
| Note |
|---|
| Note: When a column is configured as a String and set to a size of zero, it will be interpreted as a CLOB (character large object). |
The Columns tab shows the columns in the table selected in the Tables tab. When the Apply Changes right-click command in the Tables tab is executed, it updates the table structure using the column definitions from this tab.
Columns in the Columns Tab
The columns in this tab provide the following information:
Audit: When the check box in this column is selected, the system keeps a change history log for the data in the associated column. You access this log by clicking the Audit Link column's value in the appropriate data entry window.
Note Note: Auditing only works on tables that have a single-column unique index. - Column ID: This is the internal name that identifies the column.
- Column Label: This is the name of the column as seen in the application.
- Description Column: This is the name of the column that contains data for a T-List.
- Ref Table Name: For T-Lists, this is the name of the table from which the list data is taken.
- Required: When the check box in this column is selected, data must appear in the column. The system will also prefix the column name with an asterisk to denote that it is required.
- Update Order: This field configures the order in which calculated columns are calculated. This order is important whenever one calculated column is based upon the results of a second; in this case, the first column's Update Order must be larger than the second's. This field is ignored whenever the Update Source field is blank.
- Update Source – This field, when filled, indicates that
- this record in the Columns pane is a calculated column
- View Type: This column identifies the type of column. This value controls how the column is configured in the Oracle table as well as how it is displayed in data windows. Valid values are: B - Color; C - Check Box; D - Date; G - Geometry; H - Big List; R - Number; S - String; and T - List.
- .
- The where_clause is the text in the WHERE_CLAUSE field. It need not be filled, but if filled, then the calculation is only applied to those records in the table that pass the where clause criteria.
Note Note: The best way to learn to write Update Source SQL is to find several existing examples and place them into the SELECT statement configuration shown above.
Use these tips to test your Update Source SQL:
- To test if your update_source text is correct, place it into the SELECT statement configuration shown above without the where_clause. It should yield the same number of records as in the table with no duplication on the primary key or any unique index.
- To test if your where_clause text is correct, place it into the SELECT statement configuration shown above and see that it yields the expected filtered resultsWhere Clause – This field, when filled, is the WHERE clause portion of the SELECT SQL provided in the Update Source field. This field is ignored whenever the Update Source field is blank.
Right-click Shortcut Menu Commands
...
Edit Groovy Script: This command displays the Edit Groovy Script dialog box. You use this dialog box to create the Groovy script. For information on the command buttons found in this dialog box, see Description of the Groovy Script Dialog Box. After you create and test the Groovy script, you click the OK button to close the dialog box. The system then inserts the ID number of the new Groovy script in the Dynamic Create Parameters column (regardless of what was entered in the Name field of the Edit Groovy Script dialog box). The system also adds the new Groovy script to the Groovy Scripts window under the AfterChange type of scripts.
Note Note: If you wish to use an existing AfterChange Groovy script rather than create a new one, do not use this command. Instead insert a new record in the Java Triggers tab, enter com.agileassetsinc.trigger.GroovyScriptTrigger in the Class Name column, and enter the ID number of the existing Groovy script in the Dynamic Create Parameters column.
...