| Note |
|---|
| Note: The Insert Like command creates a new import configuration and copies fields from both the Imports and Import Detail tabs. |
The Imports tab of the Import Data window lists all import routines that have been configured to import data into the table selected in the Tables window. The left pane lists the import routines.
| Note |
|---|
| Note: In the left pane, the Is Public check box determines whether the routine will be available in the Import Runner window. When this check box is selected, the routine appears in the Import Runner window and may be run from that window rather than the Tables window. |
...
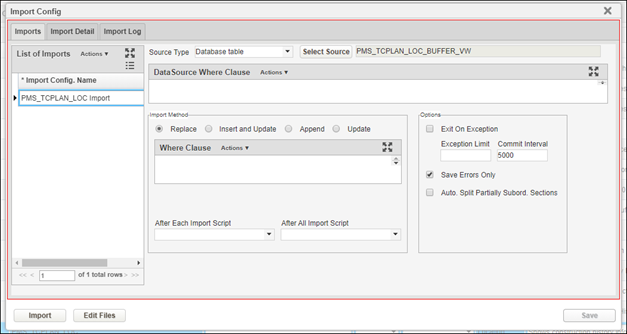
- When the Exit on Exception check box is selected, then the system will stop the import process when the number of exceptions entered in the Exception Limit field is reach (or the first exception if this field is left blank).
Regardless of the setting of the Exit on Exception check box, the Commit Interval field determines when records are committed to the database based on the number of records processed. For example, if this field is set to 1000, then after the 1,000th record is processed the system will commit the last 1,000 records to the database.
Note Note: Once records are committed to the database, an exception will not cause those records to be restored to the condition they were in before the import process began. - If the Auto. Split Partially Subord. Sections check box is selected, then the system will split the data that crosses a concurrency (subordinate) boundary. (This check box only has an effect for purely location-based data.) If this check box is not selected, then an error will result when the system attempts to enter data that crosses a concurrency boundary.
- If the Save Errors Only check box is selected, then the system will save the text describing exceptions to a log file.
The fields that are displayed in the right pane are dependent on the selected Source Type. The following table lists the different types of sources from which data may be imported and the fields that become available when you select a particular source type. Following the table is a description of the different fields that may appear in the right pane.
Note Note: For the Database Table and SQL Server Table source types, the data source is defined in the Data Source Connection window. If this window contains more than one source, the system will display a dialog box so you may select the desired source.
...
- After All Import Script: This field contains a drop-down list of After All Import Groovy scripts. If desired, you may select one to run at the very end of the import routine.
- After Each Import Script: This field contains a drop-down list of After Each Import Groovy scripts. If desired, you may select one to run after each record is imported.
- Data Source Where Clause: If you would like to restrict the data imported from the data source, you may enter an SQL statement in this field to identify the records you want to import.
- Has Header: When this check box is selected, the first record of the data source is a header record.
- Import Method: This field provides the following radio buttons to select what will happen to the records in the target table:
- The Replace method truncates the target table and then begins inserting new records from the data source.
- The Append method does not truncate the target table; new records are simply inserted at the end of the existing target table.
- In the Update method, the import routine looks for an existing record in the target table that matches a record in the data source and then updates the target table's record with data from the data source's record. (If a record is not found in the target table, the record in the data source is ignored.)
- The Insert & Update method is the same as the Update method except if a record is not found in the target table, then the record is added to the target table (rather than being ignored).
Note Note: When you select either the Update or Insert & Update method, an additional field is added to the pane called Update by Index. This is a drop-down list that contains the different means by which a record may be identified. - Loc Ref: This field provides a drop-down list of the available location reference systems. You select the LRS appropriate for the data records being imported.
Select Source: This button allows you to select the source that contains the data to be imported. When you click the button, the application displays a new window with the sources that are appropriate to the selected source type. (For example, selecting Access file as the source type would cause all Microsoft Access database files [.mdb] to be displayed when you click the *Select Source button.)
Note Note: The location where the application looks for files is set at the time of configuration. When the project manager (typically) enters a root folder in the Setup File System window, then what folders and files under that root folder will be available depends on whether your user ID has an administrative unit assigned to it in the User Names and Access window: - If the Administrative Unit field in the User Names and Access window is blank, then you will see all folders and files under that root folder.
- If the Administrative Unit field in the User Names and Access window is filled, then you will only see a file folder and its contents under that root folder that was especially made for your administrative unit. Ask your system administrator for that subfolder's name. (Note to System Administrator: The file folder name is the internal ID of the administrative unit.)
- Where Clause: When you select the Insert import method, you may enter an SQL statement in this field to identify what records are deleted from the target table.
...