To configure the R & H interface to work with other systems, follow the steps below:
| Table of Contents | ||
|---|---|---|
|
Configure the Interface on the AgileAssets System
On standard systems, the configuration page for this interface is accessed by following the steps below:
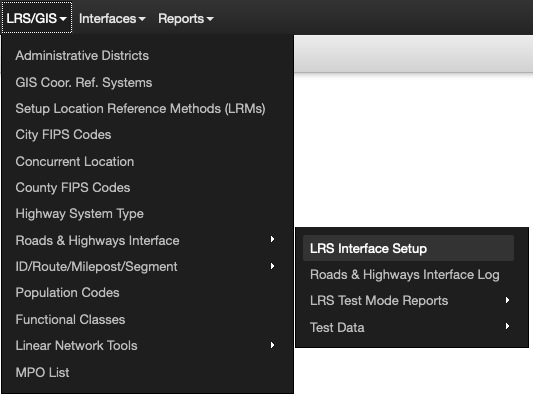
- Click LRS/GIS in the top ribbon
- Select Roads & Highways Interface
- Select LRS Interface Setup
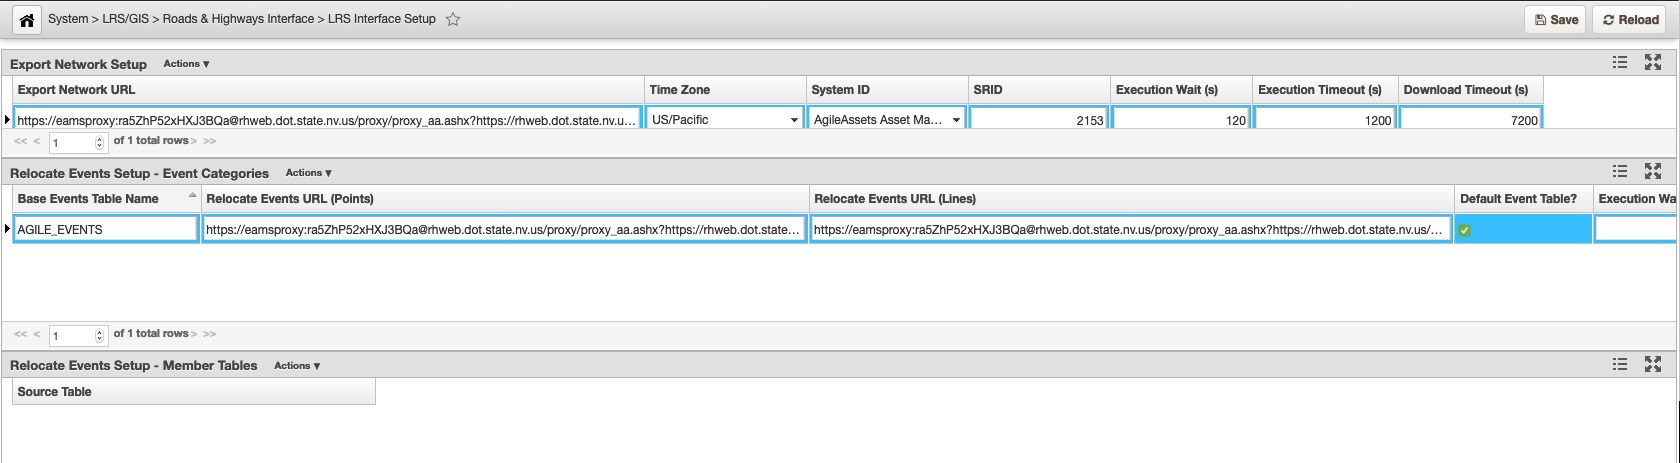
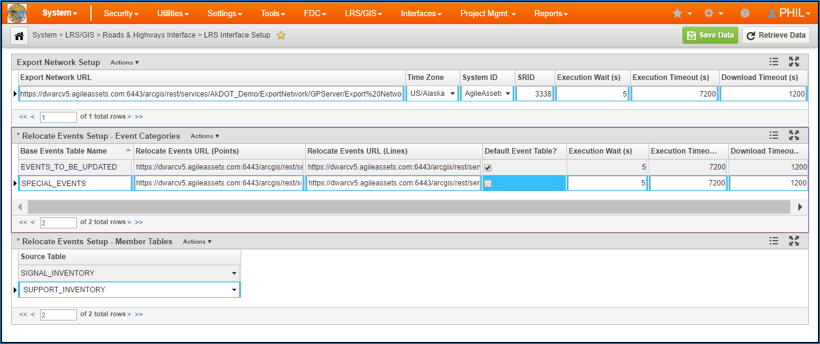
The configuration page is divided into the following three panes:
- Export Network Setup: (top pane) configures the part of the interface that imports the LRS. Note that there is one and only one record for this pane. You can modify the following fields:
- Export Network URL – This is the URL of the Roads and Highways Export Network web service. This can be left blank at this point in the configuration
- Time Zone – Set this to match the time zone configured in the Roads and Highways instance
- System ID – Pick the system associated with the base LRM being updated by the interface
- SRID – This number indicates the map projection used for the Network in Roads & Highways - a full list of these map projections is stored in the mdsys.cs_srs table in Oracle
- Execution Wait (s) – The number of seconds the system waits before checking job status of the web service job again. The standard is 5 seconds
- Execution Timeout (s) – The number of seconds the system will wait from when the web service job is submitted until the job is finished. The standard is 7200 seconds (2 hours)
- Download Timeout (s) – The number of seconds the system waits for the download of the web service job results to complete. The standard is 1200 seconds (20 minutes)
- Next Full Run Cutoff Time - The end time that will be used for running the interface in Full mode. This field will be autopopulated after a Test run
- Next Test Run Cutoff Time - The end time that will be used for running the interface in Test mode. This field needs to be populated by the person running the LRS Gateway interface. Typically this would be the date and time plus at least 1 second of the last edit that was made in the Roads and Highways system. If left unpopulated, the system automatically chooses the current date and time for the Test Run.
Relocate Events Setup - Event Categories: (middle pane) configures different event categories and allows you to select which event tables belong to each category in the following pane. Categories can be configured for each different set of event behaviors that you want to employ for different event tables.
Note Note: To insert or delete a field in this pane, the database privileges assigned to the AgileAssets application must be set to allow the creation and deletion of tables. The views created by this pane are the views that need to be registered with Roads and Highways and used in the creation of Relocate Events web services. You can insert records into this pane and modify the following fields:
- Base Events Table Name – This is the base name of the two views created when a record is inserted in this pane. This base name will have “_PTV” appended to it for point events and “_LNV” appended to it for linear events.
- Relocate Events URL (Points) – This is the URL of the Roads and Highways Relocate Events web service for the point events associated with this category. This can be left blank at this point in the configuration.
- Relocate Events URL (Lines) – This is the URL of the Roads and Highways Relocate Events web service for the linear events associated with this category. This can be left blank at this point in the configuration because it is addressed in the Complete Interface Configuration on the AgileAssets System
- Default Event Table? – By checking this option, it means that all event tables that are not specifically assigned to other categories will automatically be assigned to this category. There can be no more than one category with the default event table option checked. So, check this field if this is the default event category.
- Execution Wait (s) – Then number of seconds the system waits before checking job status of the web service job again. The standard is 5 seconds.
- Execution Timeout (s) – The number of seconds the system will wait from when the web service job is submitted until the job is finished. The standard is 7200 seconds (2 hours).
- Download Timeout (s) – The number of seconds the system waits for the download of the web service job results to complete. The standard is 1200 seconds (20 minutes).
- Relocate Events Setup - Member Tables: (bottom pane) configures which event tables are associated with each category in the Event Categories pane. The user first selects a category in the middle pane and then can enter the following field to be assigned to that category:
- Source Table – The user can insert from the pick list of event tables that they want associated with the selected event category. Each event table can be associated with at most one category. If the category chosen in the middle pane is the default category do not fill in any records in this field.
Configure LRMs on the AgileAssets System
This step correlates the LRMs in the AgileAssets system with the Networks implemented in Esri Roads and Highways.
To configure this, navigate to the LRM Setup page by follwoing the steps bellow:
- Click LRS/GIS
- Select Setup Location Reference Methods (LRMs)
For each LRM in the LRSs pane identify the number assigned to it on the Roads and Highways system in the dLRSNetworks domain and enter that number in the Net_LRM_ID field in the AgileAssets LRM Setup window. (Note: The Net_LRM_ID field may not be visible in the top pane. You must open design mode to add this field and then make it visible and editable.)
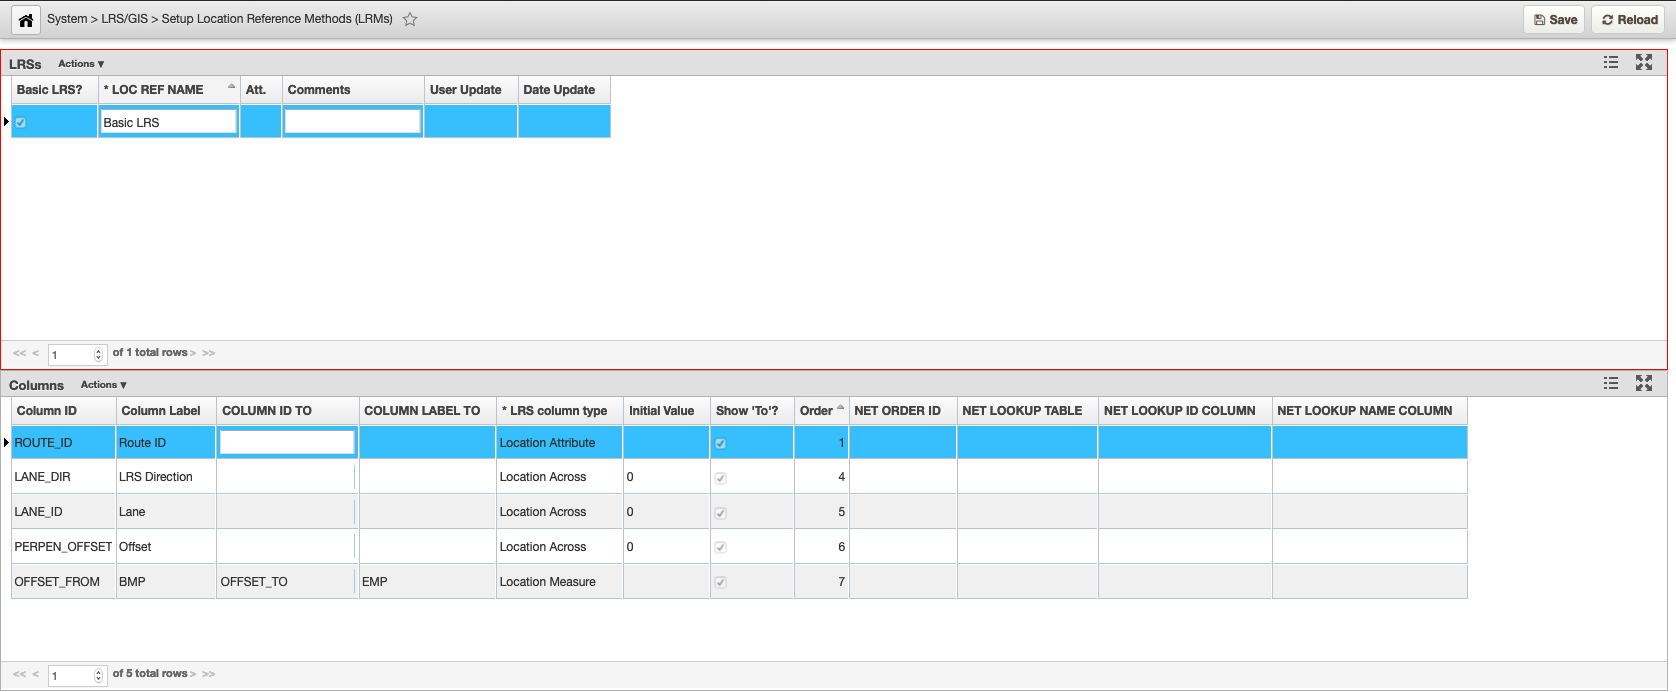
Also, in cases where an LRM has more than one route identification field (marked as Location Attribute in the bottom screen) you may need to assign each of these fields a value in the Net_Order_ID field. This specifies the preferred order of the route identification fields.
| Note |
|---|
| Note: The Net_Order_ID field may not be editable in the bottom pane. You may have to go into design mode to make it editable. |
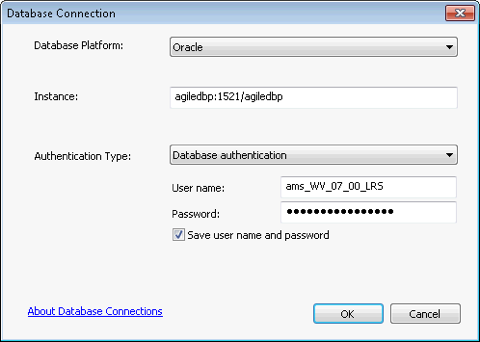
Make a Connection between ArcCatalog and the AgileAssets System
In ArcCatalog, make a database connection to the Oracle instance underlying the AgileAssets implementation. The directions for creating an Oracle database connection can be found on the Esri website at http://desktop.arcgis.com/en/arcmap/latest/manage-data/gdbs-in-oracle/connect-oracle.htm.
Register External Events with Roads and Highways
For each record entered into the Relocate Events Setup - Event Categories pane of the LRS Interface Setup window on the AgileAssets system, you will have two External event views that must be registered to the Advanced Linear Referencing System (ALRS). The names of the External Event views are created from the Base Events Table Name field of each record plus “_PTV” appended to it for point events and “_LNV” appended to it for linear events.
The directions for registering External events to Roads and Highways can be found on the Esri website (http://desktop.arcgis.com/en/arcmap/latest/extensions/roads-and-highways/registering-an-external-event-source.htm). Make sure to complete the following:
- Register the “_PTV” events as point events and the “_LNV” events as linear events.
- These event views should be registered as External events.
- Point events only need the MEASURE field assigned to its single measure.
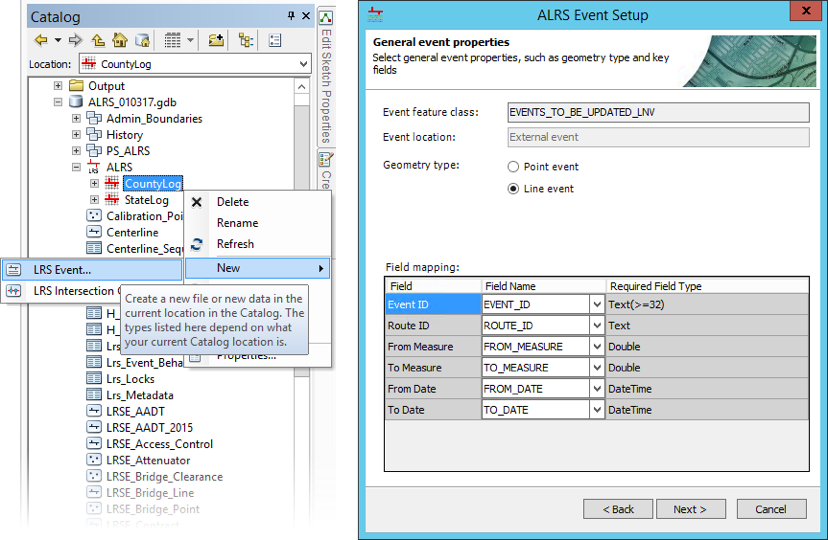
Note: The external events need to be registered to the Network that is checkmarked as the “Basic LRS” in Section 2.2.
Register the Roads & Highways database with ArcGIS Server
In almost all cases this step will have already been done, but it is listed here for completeness. However, the instructions for registration can be found on the Esri website (http://server.arcgis.com/en/server/latest/publish-services/windows/registering-your-data-with-arcgis-server-using-manager.htm).
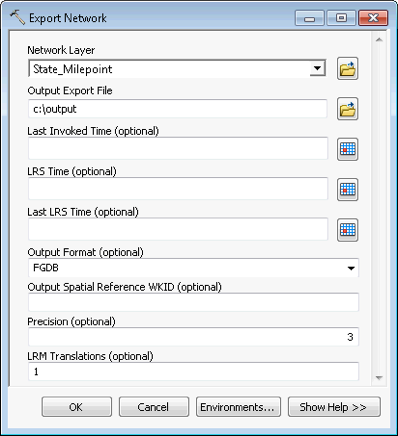
Create Roads and Highways Export Network Web Service
There are two main steps to creating the Export Network web service. First you must run the geoprocess, and then share the results of that geoprocess as a web service.
The directions for running the geoprocess and creating the web service can be found on the Esri website (http://desktop.arcgis.com/en/arcmap/latest/extensions/roads-and-highways-server/deploying-network-export-tool-as-a-service.htm).
- In the Export Network dialog, select the base LRM of the AgileAssets system (as indicated by the Basic LRS check mark in Section 2.2).
- When specifying the Output Export File make sure to include a full name with a directory path (e.g. C:\Temp\Export).
- Select FGDB for output format.
- Select the precision (number of digits to the right of the decimal point) that matches the precision of measures in the Setup_Network_Lines table in the AgileAssets system.
- The LRM Translations value must be a comma-delimited list of the numbers that Roads and Highways assigns to the networks that correspond to any alternate LRMs in the AgileAssets system. These numbers are listed in the dLRSNetworks domain. And if there are no alternate LRMs that need to be handled via the Interface, then leave the LRM Translations field blank.
- Leave the following fields blank: Last Invoked Time, LRS Time, Last LRS Time, and Output Spatial Reference WKID.
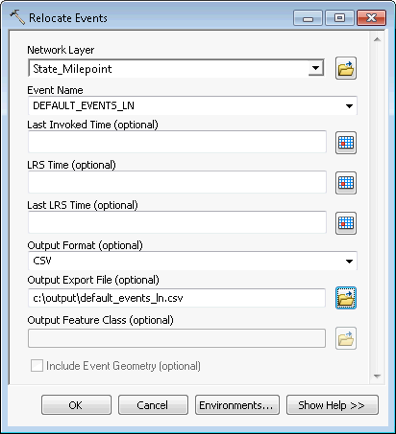
Create Roads and Highways Relocate Events Web Services
Create a Relocate Events web service for each External event registered in the Register External Events with Roads and Highways step. There are two main steps to creating a Relocate Events web service. First, you must run the geoprocess, and then share the results of that geoprocess as a web service. Both steps must be run for each registered External event.
The directions for running the geoprocess and creating the web service can be found on the Esri website at http://desktop.arcgis.com/en/arcmap/latest/extensions/roads-and-highways-server/deploying-relocate-event-tool-as-a-service.htm. Enter the network that corresponds to the base LRM in the AgileAssets system into the Network Layer. Select the Event Name for the external event associated with this iteration. Select CSV for the output format. And when specifying the Output Export File make sure to include a full name with a directory path (e.g. C:\Temp\Rel_Events_Pt).
Suggestion: when creating the web service and using the Service Editor dialog, under Parameters you may want to pick a Message Level of “Info” as this provides more meaningful error messages.
Complete Interface Configuration on the AgileAssets System
On the standard AgileAssets system, you can return to the LRS Interface Setup window by following the steps below:
- Click LRS/GIS
- Select Roads & Highways Interface
- Select LRS Interface Setup
To fill in the URLs that were left empty in an earlier step, follow the steps below:
In the Export Network URL field on the top pane, enter the URL associated with the Export Network web service that you created. To find the URL to enter here, do the following:
- In a separate browser page, visit the ArcGIS Server Manager website for this instance.
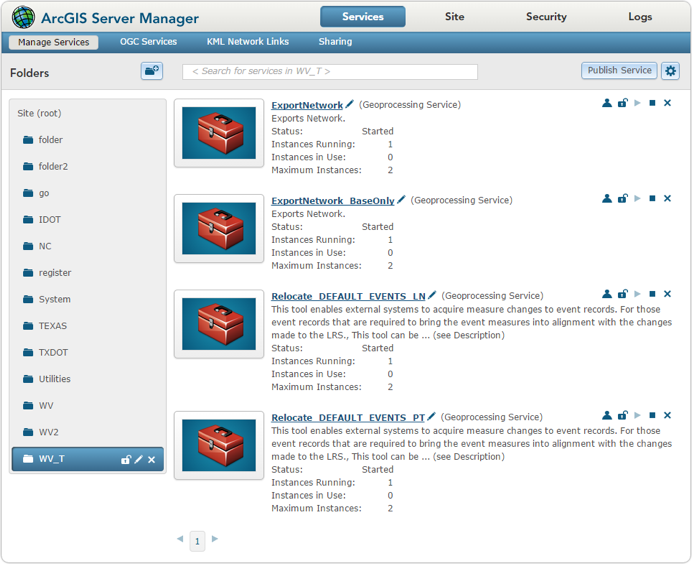
- Inside ArcGIS Server Manager, go to Services > Manage Services.
- On this page, choose the folder where you placed the web service, and then click the Export Network web service (or whatever you named your service in the Create Roads and Highways Export Network Web Service step).
- Click Capabilities on the left-hand panel.
- Click the URL next to the phrase “Rest URL”.
- Click the phrase Export Network under the heading
- Copy the URL from the address bar of the browser and paste it into the Export Network URL field of the LRS Interface Setup page.
In the Relocate Events URL (Points) field and in the Relocate Events URL (Lines) field on the middle pane, enter the URL associated with the Relocated web services that you created for each of these event categories. To find the URL to enter here, do the following for each event category:
- In a separate browser page, open the ArcGIS Server Manager website for this instance.
- Inside ArcGIS Server Manager, go to Services > Manage Services.
- On the new page, choose the folder where you placed the web service, and then click the Relocate Events web service you are working on.
- Click Capabilities on the left panel.
- Click the URL next to the phrase Rest URL.
- Click the phrase Relocate Events under the heading
- Copy the URL from the address bar of the browser and paste it into the appropriate Relocate Events URL field of the LRS Interface Setup page.
Install native FGDB libraries
One of the outputs of ESRI's Roads & Highways web services is an ESRI File GeoDatabase (FGDB). In order for our system to be able to read ESRI File GeoDatabases, native libraries must be installed.
For Linux-based servers, these libraries are named:
- so – This library is written and provided by
- ESRI, as part of the File GeoDatabase API, v. 1.4.
- so – This library is written and provided by ESRI, as part of the File GeoDatabase API, v. 1.4.
- so – This library is written and provided by AgileAssets and depends on the other libraries provided by ESRI.
For Windows-based servers, these libraries are named:
- FileGDBAPI.dll – This library is written and provided by ESRI, as part of the File GeoDatabase API, v. 1.4.
- dll – This library is written and provided by ESRI, as part of the File GeoDatabase API, v. 1.4.
- dll – This library is written and provided by ESRI, as part of the File GeoDatabase API, v. 1.4.
- dll – This library is written and provided by AgileAssets and depends on the other libraries provided by ESRI.
The implementation steps are as follows:
- Obtain the AgileAssets libraries. The choice of AgileAssets libraries are provided above. Contact AgileAssets support and provide them with operating system details of your server.
- Obtain the ESRI libraries. The Esri libraries are provided on Esri’s download page.
- Go to http://www.esri.com/apps/products/download/index.cfm?fuseaction=#File_Geodatabase_API_1.4
- Download the appropriate package for the required operating system.
- Unpack the package.
- Find the required libraries in the FileGDB_API/lib directory.
- Install the libraries. Create a directory on the application server and put all required libraries (from both Esri and AgileAssets) in that directory. Make note of the directory name. For the examples below we used /usr/local/tomcat/geo_libs.
- Create a script that lets the application server know the whereabouts of these libraries. Replace “/usr/local/tomcat/geo_libs” in the directions below with the location of your libraries as appropriate.
- For Linux:
- If a file named setenv.sh does not exist in the Tomcat bin directory, then create it and make it executable.
- For Linux, add ONE of these lines to setenv.sh:
- For versions of Java below 7 and if LD_LIBRARY_PATH is already set on the system:
- LD_LIBRARY_PATH=$LD_LIBRARY_PATH:/usr/local/tomcat/geo_libs
- For versions of Java below 7 and if LD_LIBRARY_PATH is not already set on the system:
- LD_LIBRARY_PATH=/usr/local/tomcat/geo_libs
- For Java 7 and above, the LD_LIBRARY_PATH needs to be exported and set this way:
- export LD_LIBRARY_PATH="/usr/local/tomcat/geo_libs"
- export LD_LIBRARY_PATH=/usr/local/lib:${LD_LIBRARY_PATH}
- JAVA_OPTS="‑Djava.library.path=/usr/local/tomcat/geo_libs"
- For Windows:
- If a file named setenv.bat does not exist in the Tomcat bin directory, then create it and make it executable.
- Add this line to setenv.bat:
- Set PATH = %PATH%;\usr\local\tomcat\geo_libs
- For Linux:
- Restart Tomcat.
Make at least one event table temporal
Because Roads and Highways keeps track of the dates associated with each edit the AgileAssets side of the interface needs to have fields to store this data. Those fields are created when at least one linearly-referenced table is set to “Keep Change History”.
To make a table temporal, follow the steps below:
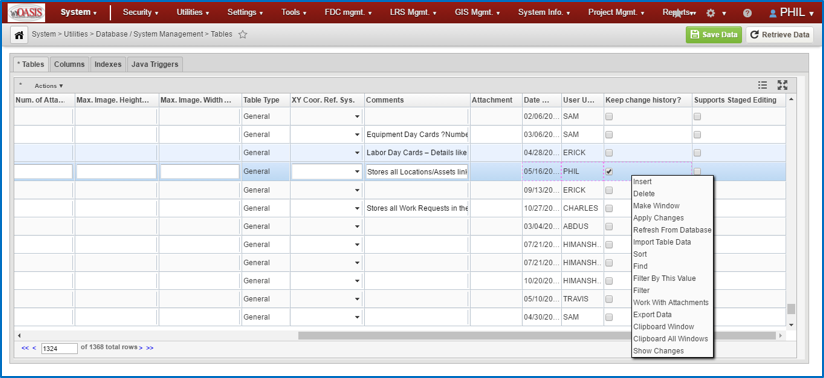
- Go to System > Utilities > Database/System Management > Tables (or wherever this window is on your implementation.
- Find a linearly-referenced table (one that has route and measures) and select its row in the table.
- Scroll to the far right of the window and place a check mark in the Keep Change History
- Right-click the row to bring up the context menu and select Apply Changes.
- A dialog may appear asking you to give a beginning birth date for your existing records in this table. By default it is 1/1/1900. Give it a date of your choosing and click OK.
- Next a dialog will appear asking if it is OK to process the script needed to make the table temporal. Click OK. This process will likely take several minutes depending on the number of records in the table.
- After the script completes click the Save Data button and this task is complete.
Configure Excluded Tables and Interface Type
An AgileAssets support person will work with you to make sure that the proper settings are made for tables to be excluded from the interface job and that your system is set to use the Roads & Highways Interface type.