Table of Contents maxLevel 2
Introduction
AgileAssets application is a web-based software package. In order to use the system, you need to have the web browser software installed (preferably Google Chrome, although all major browsers are supported).
This Training Tutorial help is intended for end users that users that will access any AgileAssets module. It provides information on basic navigation/getting started in the system.
Conventions Used in This Training Tutorial
To assist you in differentiating types of information or actions required of you, this manual uses the following typographical conventions:
The greater-than sign separates menu levels (i.e. File > Open). The first part of the path is always the module that you are in (e. Maintenance Manager, Fleet and Equipment Manager, etc.).
CAPITALS Upper case text indicates the names of keys on the keyboard (for example, SHIFT or CTRL or ALT+F4).
+ When used between keyboard keys, the plus sign indicates keys that must be pressed simultaneously to perform a command (for example, ALT+F4).
Bold Commands are shown in a heavy bold font (for example, Retrieve).
Tahoma The Tahoma font is used for text that appears in a window and statements that are to be typed in exactly as shown.
Title Caps Title Capitalization often indicates a specific data element type (for example, Task, \, Work Function).
in the system.
How to Seek Help?
Every effort is made to ensure that you can successfully use any of the AgileAssets modules to efficiently perform the tasks of your job. Yet, at times, questions may arise about features or how to perform certain tasks . A source of assistance is provided to help you: The with this, the system includes a comprehensive Help system. This system help contains information on all features of the system and provides instructions on using many features of the system. To access the Help system, click the ![]() icon on the top-right corner of your browser window when logged in.
icon on the top-right corner of your browser window when logged in.
To request additional help topics or give feedback on a specific help page, please click the  link at the bottom of the page.
Getting Started – Basic Navigation
...
How to Log onto the System
The objective of this lesson is for the participant to learn how to access to the AgileAssets system. At the end of this lesson, the user should be able to successfully log into the system and change departments (if applicable). |
|---|
...
Open a web browser and access the environment using the web-link provided by AgileAssets: The browser will display the welcome page:
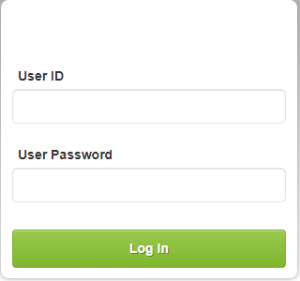
- Enter your User ID and User Password and click Log In.
The system checks the information, and if recognized, logs you on to the system.
Info Note: If your Agency is implementing SSO (Single Sign-On protocol), users will have direct access to the AgileAssets application once they log-in to their agency Network. However, If SSO is not being implemented, then the user must perform these steps to access the application. See (Document-Name) for more details on SSO process.
However, if If you are assigned to more than one organizational unit / or Department, the system displays a second window to select your organizational unit / or Department and a Security profile. An example of this window is shown below.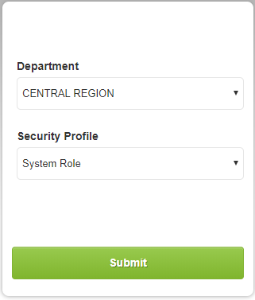
- Click on the drop-down arrow to display the list of Departments, and then select the desired unit (if applicable).
- Click on the drop-down arrrow arrow to display the list of Security Profiles, and then select the desired profile (if applicable).
- Click Submit.
You are now logged onto the system
...
and will be directed to the home
...
screen of the application.
Description of the User Interface
This topic describes the elements, menus, and icons found in an AgileAssets system. A typical screen is shown below with the numbered items described in subsequent sections.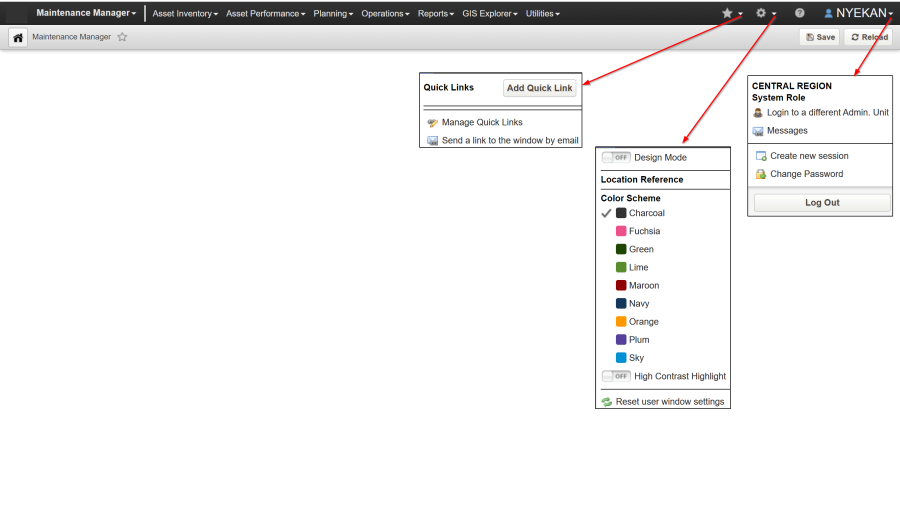
...
Menus and Icons
The objective of this lesson is for the participant to learn how to:
|
|---|
Module Name: The top left of the menu bar shows the name of the selected AgileAssets module. Perform the following steps to select a different module.
- Click the drop-down -pointing arrow (
 ) next to the module's name to display the list of available modules.
 - Then click the desired module.
- The system refreshes and display the module that was selected.
...
The AgileAssets application provides two ways to display a window: "Point & Click" commands and Quick links (which is a special, customizable form of hyperlinks).
...
How to Display a Window by
...
Point & Click
...
| The objective of this lesson is for the participant to understand how open a window using the point & click option. At the end of this section, the user should be able to open any window within a module using the point & click option. |
|---|
...
Throughout this User Documentation, the entire series of actions to open a window in a module is abbreviated as: Module Name > Menu Name > Sub-Menu Name > Window Name. In the screenshot below, to open this window, it is abbreviated as Pavement Analyst > Asset Inventory > Construction > Construction History. Once you navigate to a window, the path is displayed in the barrier area of the window.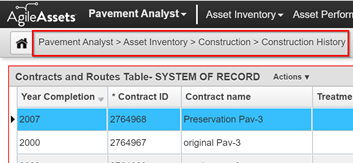
...
Display Window via Quick Links
| The objective of this lesson is for the participant to understand how to setup and open a window using the quick links option. At the end of this section, the user should be able to quickly open any window that was saved as a Quick Link. |
|---|
...
| Info |
|---|
| Note: Quick Links can be created in any window within any AgileAssets module. As you create Quick Links to the various windows within a module, they are successively added to the list of Quick Links under the Quick Links tab on the right side of the browser window. |
...
Window Display Description
| The objective of this lesson is for the participant to understand the different window layouts in the AgileAssets application. At the end of this section, the user should be able to display a window/pane in either Grid view or Form view based on the his/her preference. |
|---|
...
Scrolling if necessary, so the desired record and/or column is displayed;
Using the navigation toolbar to display a page of records.
Scroll Bars
Once a window is displayed, scroll bars are available to move what is viewable either vertically or horizontally.
...
Vertical Scroll bar: move the viewable portion of the window by scrolling up or down.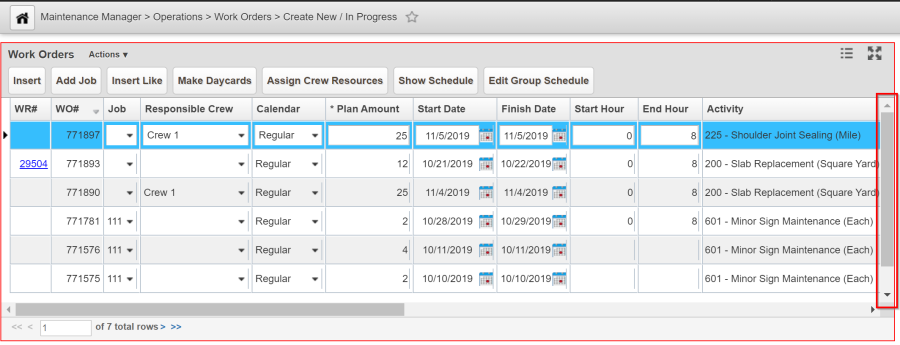
Navigation Toolbar
In addition to scroll bars, tables also provide a navigation toolbar. The tables that are displayed in the system are often quite large. In these large tables, the number of records (rows) is greater than what may be displayed in a window or pane. So, the table is divided into multiple pages of records. A navigation toolbar like the following (screenshot below) appears at the bottom of every table to inform you of the number of pages and rows in the table and to allow you to navigate to different pages.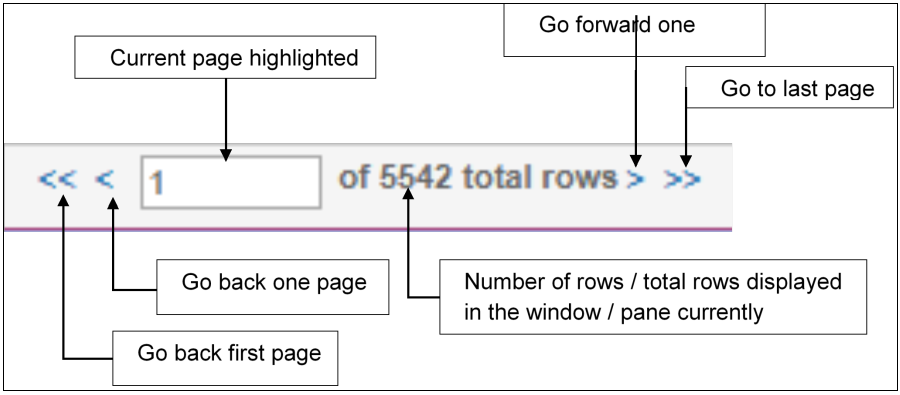
You may click the arrows to navigate to the first page, previous page, next page, or last page in the table. You may also double-click the displayed record number, type a new record number, and press Enter to go to that record. (If you enter a non-existent record number, the current page remains displayed.)
Right-Click Menu Items
Each pane in a window has a set of actions. To perform these actions, there is a menu that is available by right-clicking in the pane. This menu is referred to as the 'Right-Click menu', and the actions listed in the menu are referred to as 'right-click menu items'.
Right-click menu items can also be displayed by left-clicking on the Actions drop-down list that is available on each window/pane header ribbon.
...
There are also a set of standard right-click menu actions available in all panes, corresponding to all the windows in the software.
The menu is: Sort, Find, Filter, Export Data. The functionality of these right click menu actions / commands are covered in detail in the subsequent sections of this chapter.
...
Find - Right-Click Menu Option
| The objective of this lesson is for the participant to understand how to find records in the system using the 'Find' option. At the end of this section, the user should be able to find a text or a phrase in any column of a window. |
|---|
...
| Info |
|---|
Note: A pop-up message 'No Match' will appear once the system finds all records and there is nothing else to be displayed.
|
...
Sort - Right-Click Menu Option
| The objective is for the participant to understand how to sort data displayed in a window using single or multiple sort criteria. At the end of this section, the user should be able to sort data based on the output that he/she prefers. |
|---|
...
| Info |
|---|
| Note: Column headers are displayed only when a window shows data in Grid View. If a window is configured to open in the 'Form' view, you can switch to 'Grid' view and then choose to double click on any column to sort the data in the column. While double clicking on a column to sort the data in the column is a convenient way to sort, it works only when you are trying to sort the data in a single column (or by a single criterion). However, If you want to sort the data displayed in a window based on multiple columns (criteria), the right-click Sort command should be used. |
How to use the 'Sort' right-click menu option
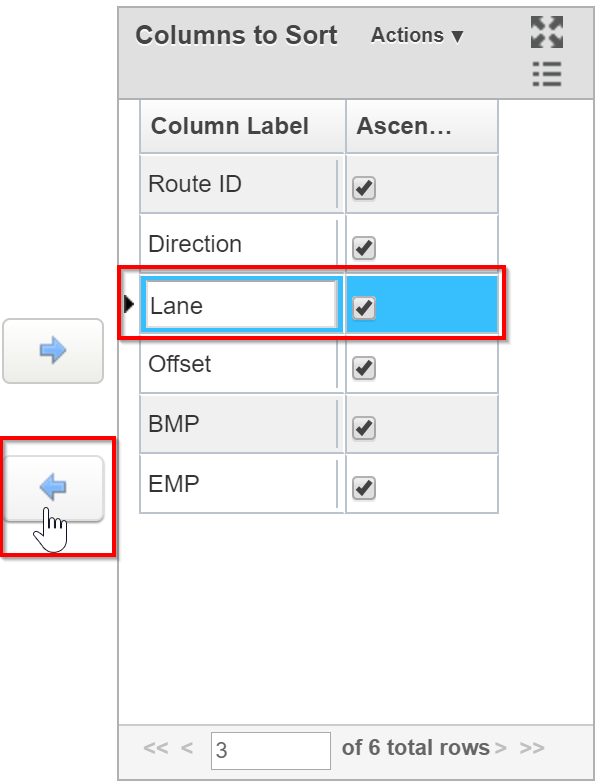
When you select the Sort command, the system displays the Sort dialog box. The left side of the dialog box shows the columns from the window available for sorting, while the right side shows the columns currently being used for sorting.
The (rightward pointing) arrow between the columns is use for selecting a column in sorting while the (leftward pointing) arrow remove a column from being used for sorting.
To perform a sort for the first time, follow these steps:
...
If you wish to remove a sort criterion from the table, highlight the row showing the criterion in the right pane and then click the left-pointing arrow in the middle of the dialog box.
...
Filter - Selecting Data to Display
| The objective is for the participant to understand how to restrict data from being displayed in a window using the Filter option. At the end of this section, the user should be able to filter data based on the output that he/she desires. |
|---|
The Filter command allows you to control data that appears in a column whenever that column is in the module. In other words, filtering a column in one window affects all windows and panes within the module that also contain the filtered column.
How to use the 'Filter' right-click menu option
For this example, we set the filter to only see records that have an AADT value of ‘1600’ in the Traffic Data window.
...
A filter can also be cleared/reset by reopening the filter window, clicking Reset and then clicking the OK.
How to use the 'Filter By This Value' right-click menu option
The Filter by This Value command allows you to select a value in a column and then filter the display to show only those records with the selected value.
When you select this command, the application displays the Filter window. However, unlike the window that is displayed by the Filter command, the left side of this window only shows the column that contains the selected value (rather than all columns that may be filtered).
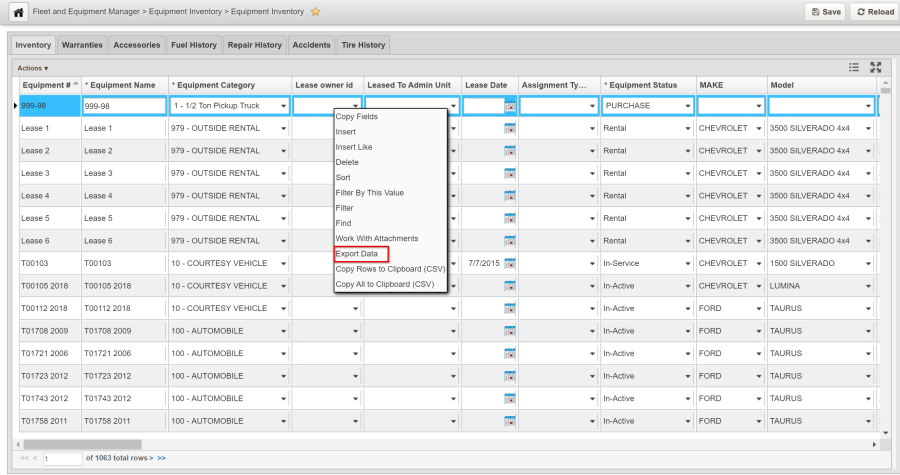
In this example (below), we use the Filter By This Value by selecting the Fuel Type of 'Diesel' in the Equipment Inventory window.
...
The filter criterion on the right side automatically sets to be equal to the selected value (as shown below). 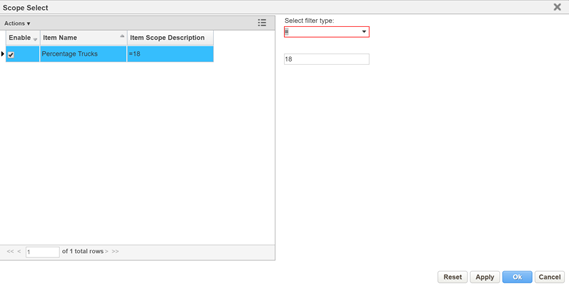
...
Adding Attachments (Files) to a Record
The goal of this chapter is for the participant to understand how to attach an external file to any record in the application. At the end of this section, the user should be able to attach a single file or multiple files to a record. |
|---|
The AgileAssets System is configured to allow the user to attach electronic file (picture, pdf, movie, AutoCAD drawing, etc.) to virtually every record in the system.
How to attach a file to a Record
In this example, we will attach an external file to a construction history record by performing follow these steps:
...
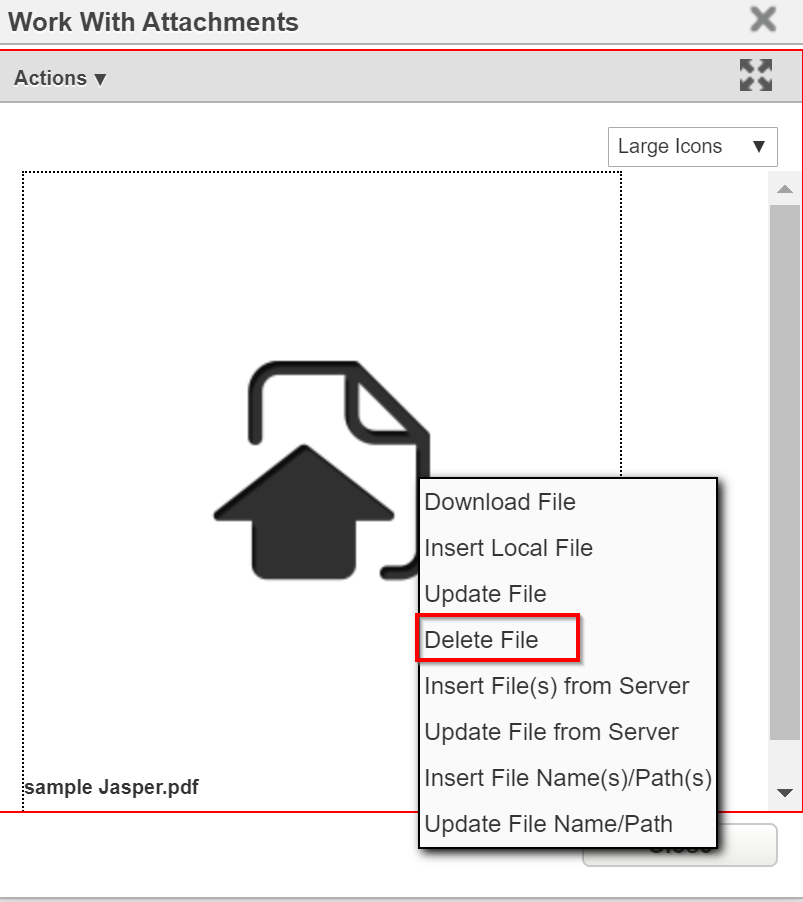
To delete unwanted attached file, double-click on the paper clip image in the Att column to open the 'Work With Attachments' window. Right-click in the pop-up window and choose 'Delete File'.
...
Exporting Data
The goal of this chapter is for the participant to understand how to export data using different output formats in the application. |
|---|
...
Open the Construction History window.
Display the desired data to be exported.
Right-click anywhere in the window and select Export Data.
- The Export Data pop-up window is displayed. This is where the user can select the data criteria.
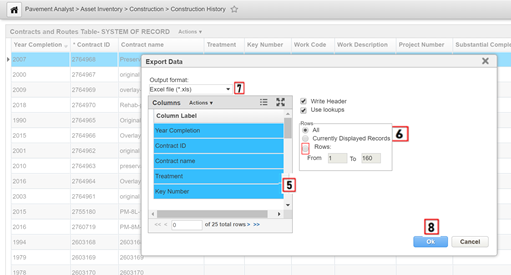
- In the columns pane by default, all the columns are selected. However, you can select the columns you would like to export by holding the CTRL key and clicking on each column of interest.
- In the Row pane, select the option you want to export.
- If you want to export all the data in the pane, Select All is selected by default.
- If you want to export only the displayed records shown, choose Current Displayed Records.
- If you want to select a range of rows, select rows and specify the "From" and "To" values.
- Select the Output Format (Excel, Comma Separated, HTML etc.).
- Click OK to export the file.
...
Editing
...
Records
| The goal of this chapter is for the participant to understand how to add, delete, or modify records in the application. At the end of this section, the user should be able to create a new record, delete an existing record, as well as modify existing records. |
|---|
This section provides an overview of how records are editing in the AgileAssets application.
Record Selection and Editing
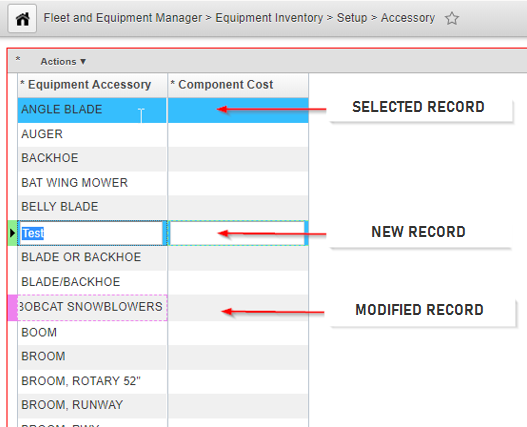
Active record or selected record is indicated by a right-pointing triangle in the leftmost column of the displayed window.
In addition, the system indicates modified data that have not yet saved by placing a pink colored bar in the far-left column beside the modified record and a pink colored rectangle around the cell with changed data.
If the record is new, the system places a green colored bar in the far-left column.
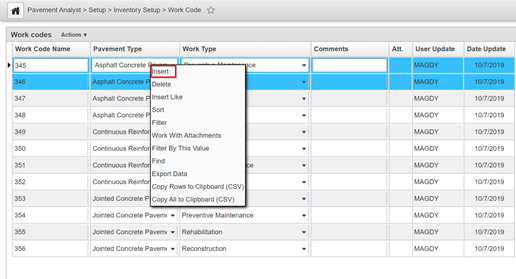
Inserting Records
The system provides two commands to insert new records into a table in a window: Insert and Insert Like.
...
Open the Create New/In Progress window.
Right-click or click the Action drop-down in the Work Orders pane and select Insert.
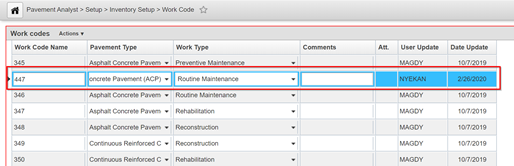
- Populate all fields that are applicable.
- ClickSave to save the record.
- Highlight any other record in the window, right-click or click the Action drop-down and choose Insert Like.
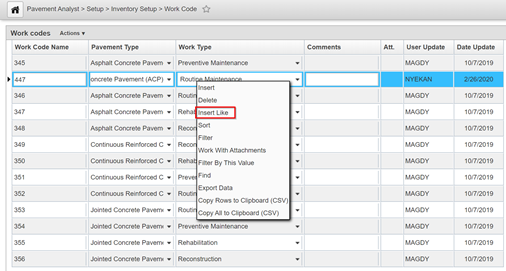
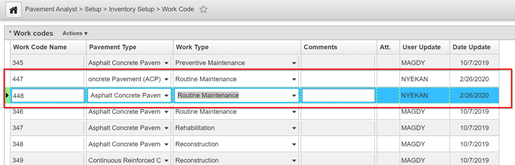
- The system adds a new record in the window and copies all the data from the selected record.
- ClickSave to save the record.
Copying Data between Records
To copy data between fields in records, you can use the CTRL+C key combination to copy the selected text or value and then CTRL+V to paste the copied data in a different record.
In the following example, we copy the comments from one work code record to another work code by performing the following steps.
- Open the Work Code window.
- Find the record that has the comments to be copied, then click in the comments field to highlight the comment
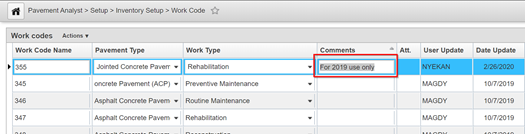
- Use the CTRL+C key combination to copy the selected text.
- Then CTRL+V to paste the copied data in a different record.
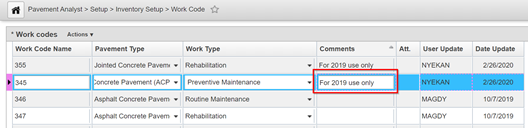
- ClickSave to save the record.
Save and Reload Data
The Agile application enables you to Save records you have modified and Reload the updated data from the database.
In this example, we modify a record in the Work Code window by updating the data in a column, save the record, and then refresh the database using the reload command.
...
However, if you wish to not save the new information, clickOK. The system discards the new information and closes the window.
How to Delete a Record
The Delete command removes the selected records or selected nodes from the table or tree view permanently.
...