With inventory and condition data configured and imported, we are ready to perform network analysis. In the system, the Network Master table is the starting point for all network analyses. These analyses depend on the columns included in the table. The columns to be included can be decided based on decision-making and reporting requirements for each customer.
The Network Master table is a key table in the system, which combines data from the various sources (asset data, pavement condition, traffic data, pavement structure). It should contain the latest information for all pavement sections. It represents the current structure, traffic, classification, and condition for the network as a whole. See an example of possible columns in Network Master below. Since Network Master provides input to analysis, it must contain information for the full network for planning and reporting purposes.
| Column Category | Example Columns |
|---|---|
Identifier (ID) | Segment ID |
| Location | Begin/End Address, Begin/End Description, Begin/End Distance |
Jurisdiction | Statewide Data Owner, Maintenance Jurisdiction, District, County |
Roadway Inventory | Length, Number of Lanes, Lane Width, Shoulder Width, Total Lane Miles, Functional Class |
Pavement Data | Pavement Type, Condition Data Year, IRI, Rutting, Faulting, Cracking |
Traffic | Traffic Data Year, AADT, VMT, ESAL |
Maintenance History | Last Treatment Type, Number of Years since Last Treatment, Last Rehab Type, Number of Years since Last Rehab, Most Recent Contract (Link to history), Pavement Age |
Structure | Total Surface Depth, Structural Class |
Two things need to be noted regarding the columns in Network Master:
- At a minimum, Network Master must include the PMSX_SEGMENT_ID and PAVE_AGE columns
- During optimization analysis, if EFF_YEAR (Effective Year) column doesn’t exist in Network Master, the analysis will use all the data in Network Master. Otherwise, the analysis will only use the data of which the EFF_YEAR field is equal to the “Year of Condition Data” field as defined in the optimization analysis. In other words, if NMF doesn’t have EFF_YEAR column, when setting up the optimization analysis, the value of “Year of Condition Data” field does not affect the results.
Because Network Master is the input data stream for network analysis, it must be re-calculated at least once per year for the current data set to be used in network analysis, and it should also be re-calculated each time any of the condition indicator settings have changed.
Network Master typically uses the current pavement management sections as the master for pavement section definitions. Other data (such as pavement management inventory, traffic, condition in the form of performance index, and construction history) are then assigned to the Network Master when it is filled. Data for the Network Master is aggregated according to rules developed for each client, using the Update Target Table function.
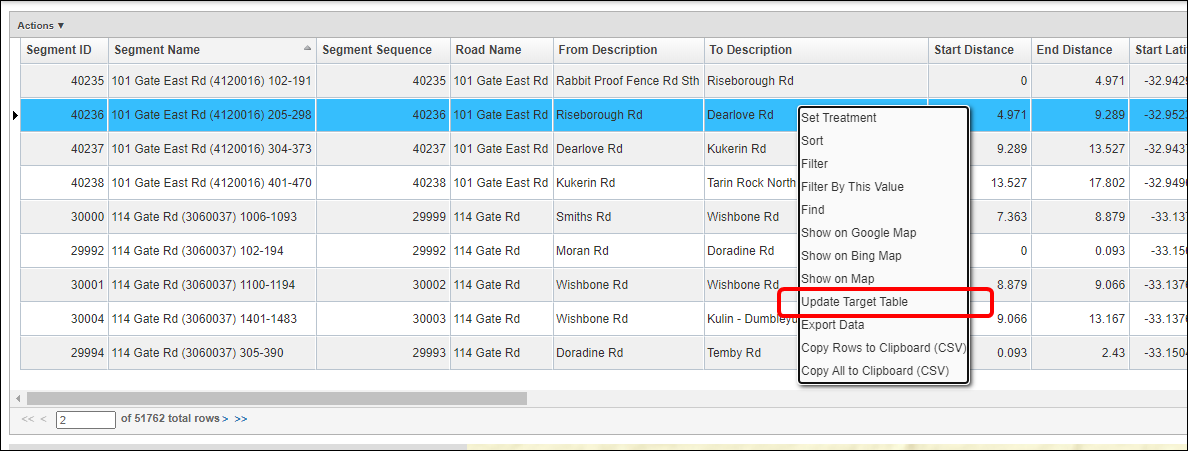
The Network Master Data window shows all road sections in the Network Master and provides descriptive information about each road section. All the columns in Network Master that are calculated using the formulas can be configured by right click and select “Update Target Table” command (pic below).
Out of the box, Network Master Data window can be navigated to by following the steps below:
- Click Analysis in the top banner menu
- Click Network Analysis in the drop-down menu
- Click Network Master
- Select Network Master Data
The table is named PMSX_NETWORK_MASTER. Out of the box, the table has the following columns:
| Column Label | Column Name | Data Type | Required to Run PMS at Minimum | Description |
|---|---|---|---|---|
| Segment ID | PMSX_SEGMENT_ID | Integer | Y | ID used through out the system to identify each segment. Primary Key of the table. |
| Segment Name | SEGMENT_NAME | String | If there is a name assigned to the segment | |
| Segment Sequence | SEGMENT_SEQUENCE | String | Allows the system to sort the segment | |
| Road Name | ROAD_NAME | String | Street/Road name of the segment | |
| From Description | DESCRIPTION_FROM | String | Begin description of the segment | |
| To Description | DESCRIPTION_TO | String | End description of the segment | |
| Start Distance | DISTANCE_START | Number (22,3) | Begin distance measure of the segment | |
| End Distance | DISTANCE_END | Number (22,3) | End distance measure of the segment | |
| Start Latitude | LATITUDE_START | Number (22,9) | Begin latitude of the segment | |
| Start Longitude | LONGITUDE_START | Number (22,9) | Begin longitude of the segment | |
| End Latitude | LATITUDE_END | Number (22,9) | End latitude of the segment | |
| End Longitude | LONGITUDE_END | Number (22,9) | End longitude of the segment | |
| AADT | AADT | Integer | Y | AADT on the segment |
| Length | LENGTH | Number (22,3) | Y | Length of the segment |
| Number of Lanes | NUMBER_OF_LANES | Integer | Number of lanes on the segment | |
| Lane Miles | LANE_MILES | Number (22,3) | Y | Lane-miles of the segment |
| Segment Area | SEGMENT_AREA | Number (22,3) | Segment area | |
| Lane Width (Per Lane) | PER_LANE_WIDTH | Number (22,3) | Per lane width | |
| Shoulder Width | SHOULDER_WIDTH | Number (22,3) | Shoulder width | |
| Segment Width | SEGMENT_WIDTH | Number (22,3) | Segment width in total | |
| Percent Truck | PCT_TRUCK | Number (22,2) | Truck percentage | |
| Last Rehab Year | YEAR_LAST_REHAB | Integer | Last year of rehabliation on the segment | |
| Last Preventive Maintenance Year | YEAR_LAST_PM | Integer | Last year of preventive treatment on the segment | |
| Address: Left Side From | ADDRESS_LEFT_FROM | Integer | Left side of the segment: Begin address | |
| Address: Left Side To | ADDRESS_LEFT_TO | Integer | Left side of the segment: End address | |
| Address: Right Side From | ADDRESS_RIGHT_FROM | Integer | Right side of the segment: Begin address | |
| Address: Right Side To | ADDRESS_RIGHT_TO | Integer | Right side of the segment: End address | |
| Address: From | ADDRESS_FROM | Integer | Segment Begin Address | |
| Address: To | ADDRESS_TO | String | Segment End Address | |
| Zip Code | ZIP_CODE | String | Zip code | |
| City | CITY_ID | Integer | City | |
| County | COUNTY_ID | Integer | County | |
| Maintenance Jurisdiction | MAINTENANCE_JUR_ID | Integer | Maintenance Jurisdiction | |
| NHS Type | NHS_TYPE_ID | Integer | NHS Designation | |
| Functional Class | FUNCTIONAL_CLASS_ID | Integer | Y | Functional Class |
| Pavement Type | WC_ID | Integer | Y | Pavement Type |
| One-way Street? | ONEWAY | Integer | Whether the segment is one-way | |
| Divided Street (median) | DIVIDED | Integer | Whether the segment is divided (with a median) | |
| Condition Data Year | PMS_CONDITION_DATA_YEAR | Integer | Condition Data Year | |
| Pavement Condition Index (PCI) | PMS_PCI_INDEX | Number(22,3) | Y | Pavement Condition Index |
| Comment | COMMENT_STR | String | Comment | |
| User Update | USER_UPDATE | Integer | Last update user | |
| Date Update | DATE_UPDATE | Date | Last update date/time | |
| Geometry | GEOM | Geometry | Geometry. Hidden from the window. |
The data in Network Master does not change during optimization analysis even if the analysis is multi-year. Network Master data is copied to USER_OPTIMIZATION_ENGINE table where data is processed and changed by the application to provide analysis results.
Configuration of Network Master includes two main steps:
- Expanding the table to include the needed columns.
Similar to other pavement data, the configuration of Network Master dataset starts by expanding the table structure to include customer-specific data element and then add those columns to the window.
Follow the instruction detailed in “Create and Import Lookup Values” and “Add Columns to a Table” Chapter in “AgileAssets System Foundation Configuration Guide” and add them into the corresponding table.
After all the columns have been added to the table, follow the instruction detailed in “Add Columns to a Data Window” section in “AgileAssets System Foundation Configuration Guide” to add those columns to the window. - Create the data aggregation rule on each column.
Update Target Table function is where this step is used.
In every single table, the user has the option to update the data in any given column with the use of SQL statements. It is this functionality that is used to copy the data from the various data tables and aggregate it into the NMF table. These statements are created/written by the user directly in the front-end of the system.
When a particular Table window is opened (System > Utilities > Tables), and the Columns tab is clicked upon, the Update Source column, the Where Clause column, and the Update Order column can be found – you may have to scroll to the right for these to become visible in the window. These fields are used to update that particular table by utilizing SQL statements.
Note: It is expected that some prior knowledge of writing SQL statements exists in order to complete this element.
- Update_Source: When filled, this field indicates that this record in the Columns pane is a calculated column and is the SELECT SQL statement that performs that calculation.
- Where_Clause: Applies a conditional argument to the calculation and subsequent field update.
- Update_Order: Configures the order in which calculated columns are calculated. This order is important whenever one calculated column is based upon the results of a second; in this case, the first column's Update Order must be larger than the second's.
This field is ignored whenever the Update Source field is blank.
The SQL statements are placed in the Update_Source and Where_Clause fields. For the data to be successfully and correctly updated, these fields must be completed correctly.
A general form for the SQL statement is:
SELECT (update_source) AS column_name FROM table_name A WHERE where_clause
Such that:
- The SELECT statement is legal and when run without the where_clause selects one and only one record for every record in the table_name.
- The table_name is the appropriate table being updated (as identified in the currently selected record in the top pane of the window you're using).
- The column_name is the appropriate column being updated (as identified in the currently selected record in the Columns pane of the window you're using).
- The update_source is the text in the UPDATE_SOURCE field. If filled, then this record in the Columns pane is a calculated column.
- The where_clause is the text in the WHERE_CLAUSE field. It need not be filled, but if filled, then the calculation is only applied to those records in the table that pass the where clause criteria.
Note: The best way to learn to write Update Source SQL is to find several existing examples and place them into the SELECT statement configuration shown above.
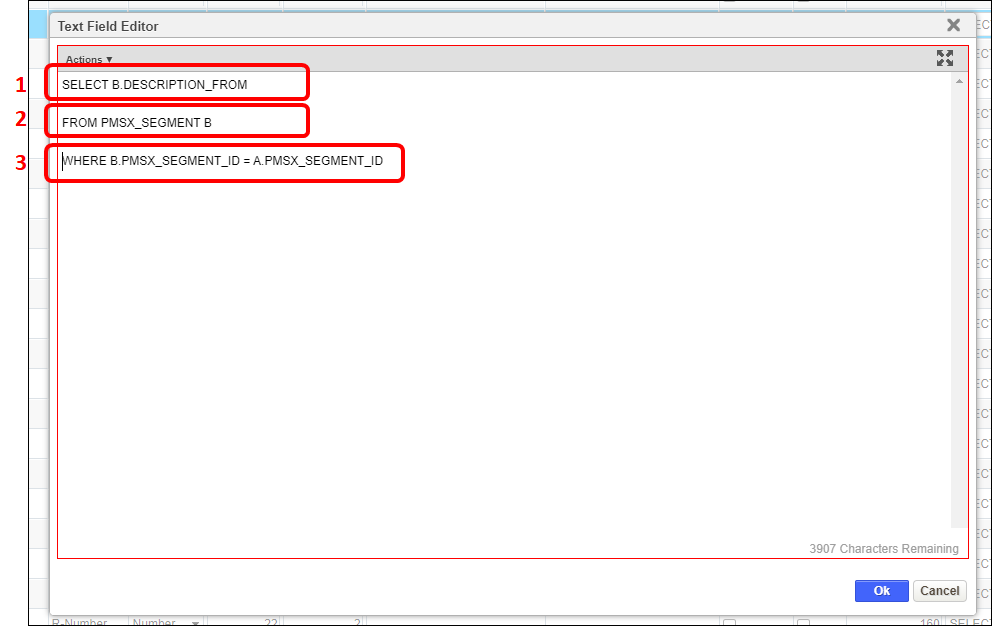
The example below details how a full Update Source SQL statement is constructed.
- The Select statement states that the data will be derived from the DESCRIPTION_FROM column.
- The From statement states that the data will be derived from the PMSX_SEGMENT table.
- The Where statement details the location elements to match each individual road segment, i.e., PMSX_SEGMENT_ID
To complete this process, follow the steps below:
- Navigate to the Network Master File table by clicking System in top banner menu
- Click Utilities in the drop-down menu
- Select Tables
- Click Columns
- Locate the Update Source, Update Order, and Where Clause columns in the table
- For each field to be updated from a source table:
- Enter the SQL statement as described above into the Update Source field
- Complete the Update Order field with a numerical value to define the order of update. The lower the value the earlier in the update process this field is updated
- Complete the Where_Clause column if required to act as a filter on the field data being loaded/updated
- Click Save to save the changes
- To update the data in the table according to these SQL statements, navigate to the window that shows the current table (in the example below we navigated to the Network Master window by clicking Analysis in the top banner menu, clicking Network Analysis in the drop-down menu, and then selecting Network Master)
Right click in this window to open the drop-down menu - Select Update Target Table.
- In the pop-up window select the columns to update using the check box in the Select column
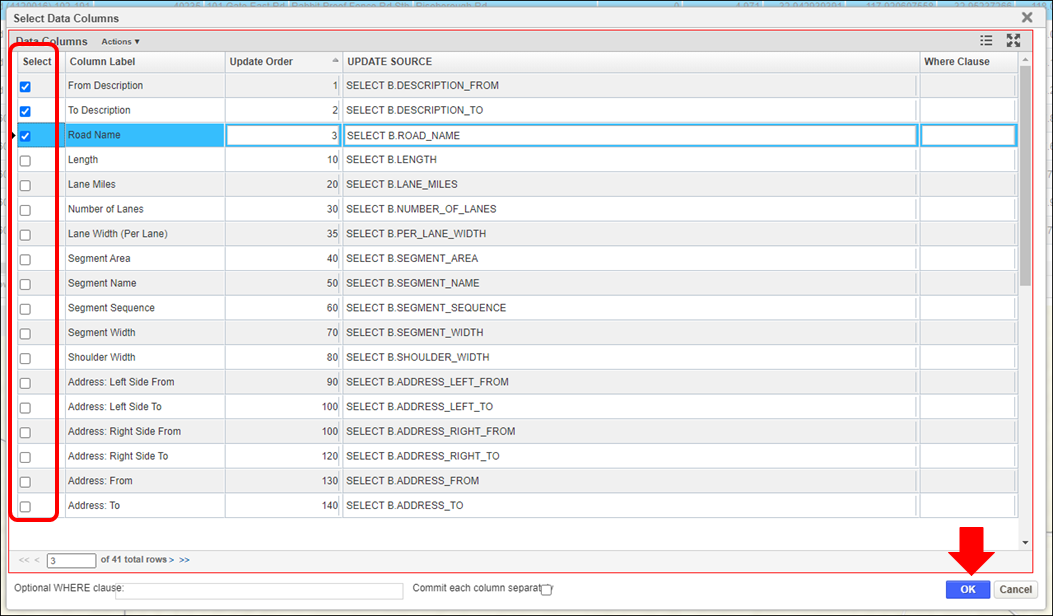
- Click OK and the selected calculated columns are updated using the current data from which it is calculated
After all the configuration is done, when it is time to update the network every year, the system has provided a system to update Network Master out of the box. It includes both Copying Management Sections into Network Master and Run Update Target Table on Network Master. The system job is named Pavement Express: Create and Update Network Master.