To edit an inventory record information, the record must be in one of the editable statuses which are New Input in Process and Edit in Process.
Adding, removing, and modifying attachment files and comments (in Inventory Edit Review Comments tab) are exempt from this general rule.
The process for editing an inventory record varies depending the type of information. Instructions for the follow types are available below:
Update Inventory Information
- Verify that the record is in one of editable statuses.
If not, the record needs to go through the inventory process to be put back in editable status. - Update information of editable fields. Locked fields are greyed out. Field(s) with modified but currently unsaved values will have dotted lines around them.
- When there is unsaved information in the window, Save Data will turn green. Click Save Data in the upper right corner to save the changes. You will see a Save Successful banner and Save Data will turn grey again.

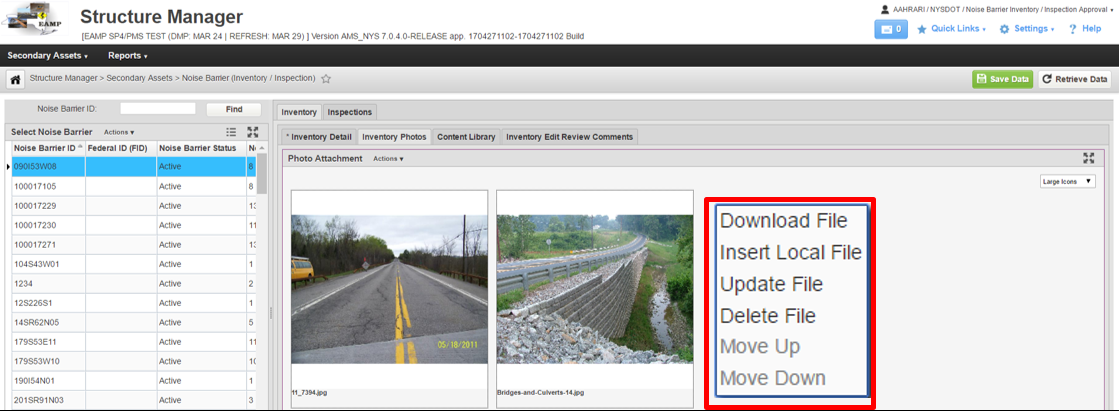
Update Photos
- In the navigation pane, select the record that you want to attach photos to.
- Navigate to the Inventory Photos tab and right-click.
- Use one of the right click functions which are NOT greyed out. Generally, available options are:
- Download File if a file is uploaded.
- Insert Local File to upload a file to the system from local machine
- Update File to replace an uploaded file
- Delete File to delete a selected file,
- Move Up or Move Down to adjust the position of uploaded files.
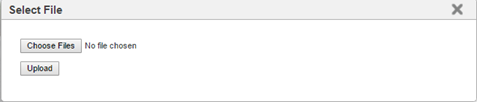
4. When inserting a new file, the user needs to choose the file from local machine. To select files click Choose Files, select which files you would like to attach, and then click Upload.
5. All actions need to be saved using Save Data.
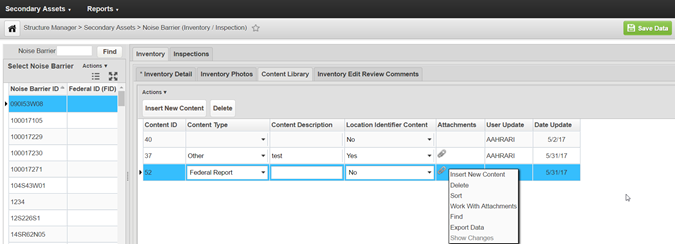
Update Content Library
Verify that the record is in one of editable statuses.
If not, the record needs to go through the inventory process to be put back in editable status.
- In the navigation pane, select the record you want to create content for.
- Navigate to Content Library tab.
- The following options are available in this tab:
- Insert New Content to create a new content record. This functionality will create a new content record and automatically save it.
- Delete to delete an existing content. Once the record is deleted, changes must be saved using Save Data.
- Insert New Content to create a new content record. This functionality will create a new content record and automatically save it.
- To update information on a content record, adjust information in all relevant fields and click Save Data.
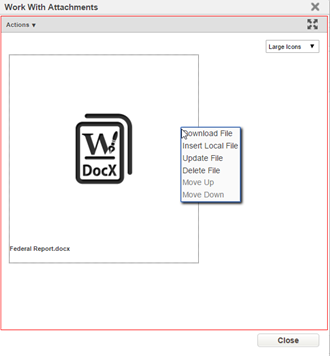
- To Insert / update content files, right click on Attachments field of the content record and right-click for the functionality menu and select Work With Attachments.
- At this step, a pop-up of Work With Attachments will show up with the right-click function menu for managing attachments.
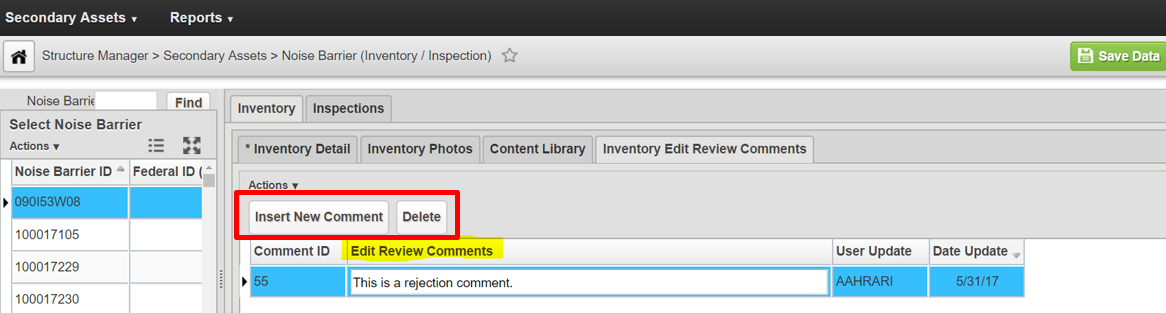
Update Inventory Comments
- In the navigation pane select the record on which you want to add, remove, or update review comments. User can work on comments regardless of the record status.
- Navigate to the Inventory Edit Review Comments tab.
- The following options are available in this tab:
Insert New Comment to create a new comment. This function will create a new comment record and automatically save it.
Delete to delete an existing comment. Once the comment is deleted, changes must be saved using Save Data. User may need to respond to confirmation question according.
- To update information of a comment, adjust all information in relevant fields as needed and click Save Data.
Activate or Deactivate a Record
Assets inserted into the system are defaulted to Active status. Assets can only be inactivated by users with relevant Inventory / Inspection Approval security profile.
To deactivate a record, follow the steps below:
- Select the record in the navigation pane.
- Navigate to the Inventory Details tab
- Enter the reason for inactivation in the Inactivation Reason field
- Right-click in Inventory Details tab and select Inactivate Asset from the function menu.
- Respond to the confirmation question accordingly.
- The asset will be inactivated and automatically saved if the user responds OK to the confirmation question.
- For activating an asset, user with Noise Barrier Inventory / Inspection Approval security profile can directly
To activate a record, follow the steps below:
- Select the record in the navigation pane
- Use the Status drop-down and change asset status to Active.
