Decision Tree Window
Once Upper-Level Decision Tree has been configured, all the Lower-Level Decision Tree and Decision Tree Sets are configured in the Decision Tree window which can be accessed by following the steps below:
- Click Pavement Analyst in the top banner menu
- Click Setup
- Click Network Analysis Setup
- Click Decision Trees
- Select Decision Trees menu
This window contains two tabs: The Selection tab and the View/Edit tab.
The Selection tab contains the following panes: Decision Tree Sets, Upper Level, and Decision Trees.
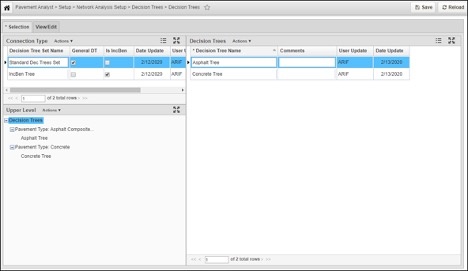
Panes in the Selection tab | Description |
|---|---|
Decision Tree Sets | This pane shows all the Decision Tree Sets defined in the system. As explained in the previous section, a Decision Tree Set is composed of the Upper-Level Decision Tree, connected by multiple Lower-Level Decision Trees. Depending on the type of connections, the system supports 2 types of Decision Tree Sets:
Note: For each Decision Tree Set, only one check box should be checked for the above two options. The system will automatically uncheck the other one when you check one of the boxes. |
Upper Level | For the decision tree set selected in the Decision Tree Sets pane, this pane shows the Upper-Level Decision Tree (as configured in the Upper Level Decision Tree window), and which Lower-Level Decision Tree(s) are assigned to each branch of the Upper-Level decision tree. |
Decision Trees | This pane shows a table that lists all Lower-Level Decision Trees created in the system. |
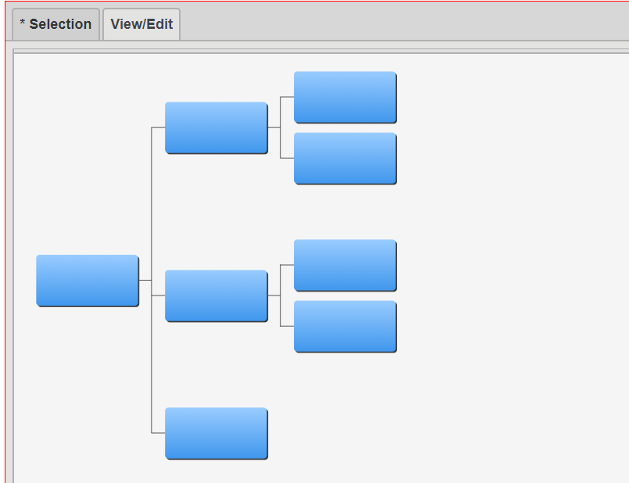
The View/Edit tab - For the Lower-Level decision tree selected in the Decision Trees pane of the Selection tab, the View/Edit tab shows the nodes of the lower-level decision tree. Use the View/Edit tab to create and maintain lower-level decision trees by editing their structure, decision thresholds, and treatment outcomes. For parent nodes, the decision variable is shown. For child nodes, the treatment is displayed. The decision tree flows from left to right, and the nodes are numbered from the top to the bottom.
When this tab is displayed, the system only displays a portion of the decision tree. You can view other parts of the decision tree by holding down the mouse key and then dragging the decision tree as desired. You can also change the magnification by using the wheel on the mouse.
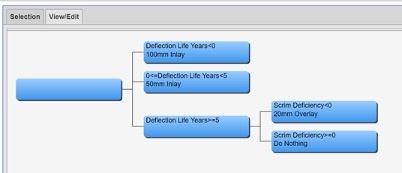
When you right-click a node in the decision tree, the following special commands are displayed:
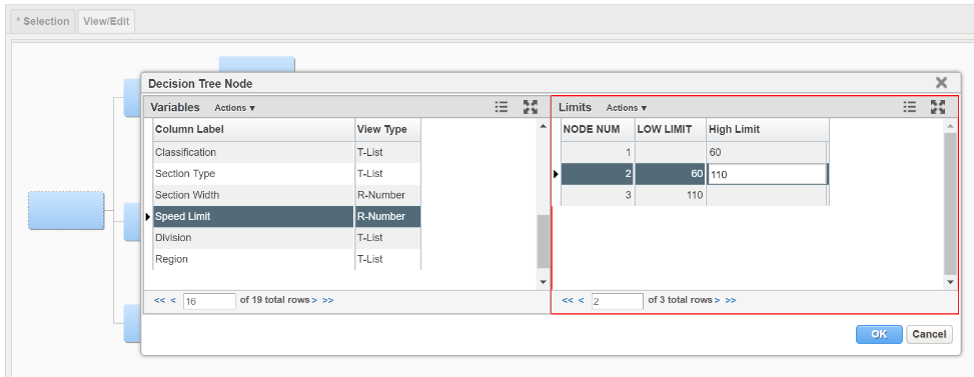
- Edit Decision Var Limits: This command is only available for nodes that have children. After selecting this command, the system displays a new window in which you select the index and thresholds that will be used to determine which treatment alternative (tree branch) will be selected. The set of decision tree variables that may be selected are configured in the Decision Variables column in the PMS Analysis Columns window (see Update PMS Analysis Column for details).
- Edit Treatment: This command is only available for nodes that do not have child nodesa. After selecting this command, the system displays a new window in which you select the treatment to be applied.
- Edit First Treatment Alternative: This command is only available for INCBEN decision trees and nodes that do not have children. After selecting this command, the system displays a new window in which you select the treatment to be applied if the indicated treatment cannot be applied.
- Edit Second Treatment Alternative: This command is only available for INCBEN decision trees and for nodes that do not have children. After selecting this command, the system displays a new window in which you select the treatment to be applied if neither the indicated treatment nor the first alternative can be applied.
Create a New Decision Tree Set
Configuration of a Decision Tree Set starts with creating a new one. To create a new set, follow the steps below:
- Open the Decision Trees window
- In the Decision Tree Sets pane, right-click and select Insert and a new record is automatically added to the pane
- In the Decision Tree Set Name column of the new record, enter a name for the set
The name you enter here will appear in the drop-down list in the Optimization Analysis window - Click Save to save the new information
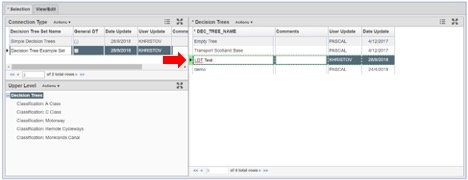
Create a New Lower-Level Decision Tree
After creating the Decision Tree Set, the next step is to create a new Lower-Level decision tree, first diagram the different levels needed in the hierarchy and what arguments are required to select the branches of the decision tree. The diagram should also indicate what treatments result at the termination points of each branch in the decision tree.
Once the decision tree diagram has been determined, to enter it into the application follow the steps below:
- Open the Decision Trees window
- In the Decision Trees pane of the Selection tab, right-click and select Insert and a new record is automatically added to the table
The decision tree set selected in the Decision Tree Sets pane does not affect the creation of a lower-level decision tree - Enter the tree name in the Dec Tree Name column
- Select the View/Edit tab
The application shows a single node that is the start of the decision tree - Right-click the node and select Add Branch
The system displays a dialog box so you can enter the number of nodes required - Using the hierarchy diagram developed, enter the number of nodes needed below the node you right-clicked in the dialog box and select OK
The system adds the entered number of nodes to the decision tree - Repeat steps 5 and 6 to create the hierarchy to match the decision tree diagram
Add Decision Variables
Once the decision tree is created, the next step is to add the decision variables and values that govern what branches are selected by following the steps below:
- Right-click a parent node and select Edit Decision Var Limits
The system displays a dialog box so you can select the desired decision variable - In the left pane of the dialog box, select the desired decision variable
The system responds by configuring the right pane for entry of the values that cause each child node to be selected - Configure the right pane of the dialog box to appropriately select each child node
- Select OK to close the dialog box
Repeat steps 1 through 4 above to the remaining parent nodes in the decision tree.

Assign Treatments to Termination Points
Now that the decision variables and values are set, the final task is to assign treatments to the termination points of each branch in the decision tree.
To assign the first treatment, follow the steps below:
- Right-click the first termination node and select Edit Treatment
The system responds by displaying a dialog box, so you can select the desired treatment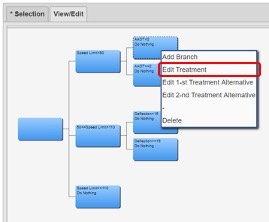
- In the dialog box, click the down arrow to display the list of treatments and select the desired treatment
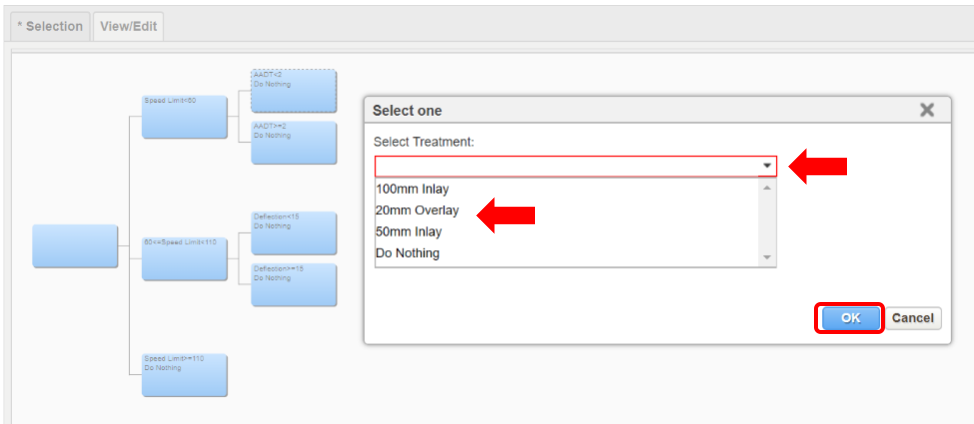
- Select OK to close the dialog box
The selected treatment is shown in the termination node (alternate treatments are shown by hovering over the node) - Repeat steps 1 through 3 for the remaining termination nodes of the decision tree
- Select the Selection tab
- Select Save to save the new information
Note: A list of all available treatments for optimization analysis and their properties are displayed in Treatments window (detailed in Chapter 6).
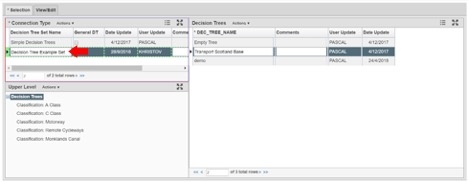
Connect a Lower-Level Decision Tree
To connect a Lower-Level Decision Tree to an Upper-Level Decision Tree node, follow the steps below:
- Open the Decision Trees window
- In the Decision Tree Sets pane, select the appropriate decision tree set by locating the record for the desired set and selecting the record to select it
The system responds by highlighting the record to show that it is selected and also refreshes the Upper Level pane to show the lower-level decision tree assignments for the selected decision tree set - In the table in the Decision Trees pane of the Selection tab, click the record showing the lower-level decision tree to be assigned
The system highlights the record to show that it is selected - In the Upper Level pane on the lower left, find the child node of the upper-level decision tree to which you want to assign the selected lower-level decision tree
- Right-click the child node found in the previous step and select Assign Selected Tree
The system refreshes the hierarchy shown in the Upper Level pane to show the lower-level decision tree attached to the upper-level decision tree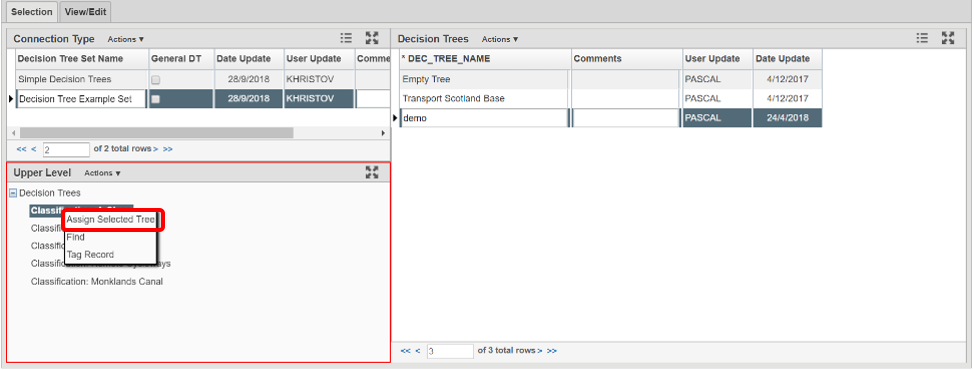
- Click Save to save the new information
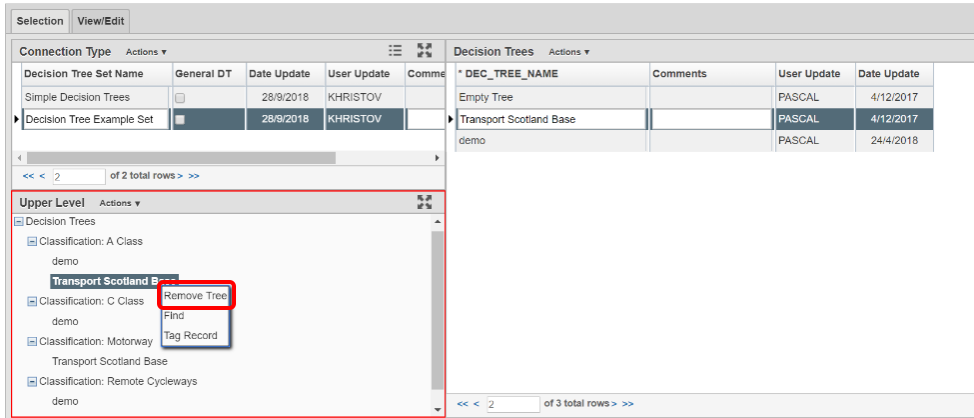
Note: To disassociate a Lower-level Decision Tree in the Upper Level pane of the Selection tab, find the node that corresponds to the lower-level decision tree that will be disassociated from the upper-level decision tree and Right-click on it. Select Remove Tree. Then click the Save button to save the new information.
Delete a Lower-Level Decision Tree
To delete a lower-level decision tree, follow the steps below:
- Open the Decision Trees window
- In the table in the Decision Trees pane of the Selection tab, right-click the lower-level decision tree to be deleted and select Delete
The application checks whether the decision tree is assigned:- If it is not assigned, the tree is deleted
- If the decision tree is assigned, the application displays a message that says, "This sub-tree is still assigned, do you still want to delete?" Click Yes if you want to delete it; otherwise, click No
- Click Save to save the new information.
Modify a Lower-Level Decision Tree
To modify a lower-level decision tree, use the following procedures:
Change Name
To change the name of a decision tree in the table of the Selection tab, highlight the existing name and then type the new name.
Change Treatment
To change the treatment assigned to a termination node, right-click the node and select the appropriate command for which treatment you wish to change.
Change Values
To change the values that determine which branch is followed, display the View/Edit tab. Then right-click the parent node and click Edit Decision Var Limits. In the dialog box that displays, re-configure the right pane with new values to determine what branches are followed depending on the value of the decision variable.
Change Decision Variables
To change the decision variable that determines which branch is followed, you can only use a decision variable that has not been used at a different level of the decision tree. This may mean that you will have to alter the decision variables for more than one node.
To change the decision variable, use the Edit Decision Var Limits command to select the decision variable and the values that determine what branch is followed.
Remove a Node
If you want to remove a node from the decision tree, only child nodes can be deleted. Furthermore, if a parent only has two child nodes and you delete one of them, the system will automatically delete the other as well.
To delete a node, right-click the child node and select Delete.