Update Network Master
After all the data needed are loaded into the system, we can prepare the system to run analysis. Network Master file is the starting point for all network analyses. These analyses depend on the columns included in the table. The columns to be included can be decided based on decision-making and reporting requirements for each customer.
Network Master table is a key table in Pavement, which combines data from the various sources (asset data, pavement condition, pavement structure). It is the starting point for all network analyses and should contain the latest information for all pavement sections. It represents the current structure, traffic, classification, and condition for the network as a whole. Out of the box, Network Master Data window can be navigated to by following the steps below:
- Select Pavement Express in the module menu
- Click Analysis
- Click Network Analysis
- Click Network Master
- Select Network Master Data
Because Network Master is the input data stream for network analysis, it must be re-calculated at least once per year for the current data set to be used in network analysis, and it should also be re-calculated each time any of the condition indicator settings have changed.
Network Master typically uses the current pavement management sections as the master for pavement section definitions. Other data (such as pavement management inventory, traffic, condition in the form of performance index, and construction history) are then assigned to the Network Master when it is filled. Data for the Network Master is aggregated according to rules developed for each client, using the Update Target Table function.
The Network Master Data window shows all road sections in the Network Master and provides descriptive information about each road section. All the columns in Network Master that are calculated using the formulas can be configured by right click and select “Update Target Table” command (pic below).
The Network Master Configuration will configure the Network Master to include all the fields needed for analysis and reporting. As part of the process, a system job routine will be setup to update the Network Master based on the rules defined by the agency . When it is time to update Network every year, navigate to the System Job Schedule window by following the steps below:
- Select System in the module menu
- Click Tools
- Click System Job
- Click Schedules
Then execute system job named Pavement Express: Create and Update Network Master.
Update Performance Master
Performance analysis uses pavement management history information to provide a feedback mechanism to improve the predictive capabilities of pavement performance models. The primary repository for data used in performance analysis is the Performance Master.
The main difference between Performance Master and Network Master is that Performance Master has an EFF_YEAR column, and can be considered an archive or “history” of Network Master’s data from each year.
Performance Master usually contains the exact same column as Network Master, and typically follow the same data aggregation rules. Normally, each year after the Network Master is finalized, the user runs the process to update Performance Master, which will append Network Master’s data to Performance Master.
Out of the box, Network Master Data window is located in Pavement Express > Analysis > Performance Analysis > Performance Master menu.
The Performance Master Configuration will configure the Performance Master to include all the fields needed for analysis and reporting. As part of the process, a system job routine will also be setup to update the Network Master using the rules defined by the agency . When it is time to update the dataset every year, follow these steps:
- Select Pavement Express in the module menu
- Click Setup
- Click Data Import
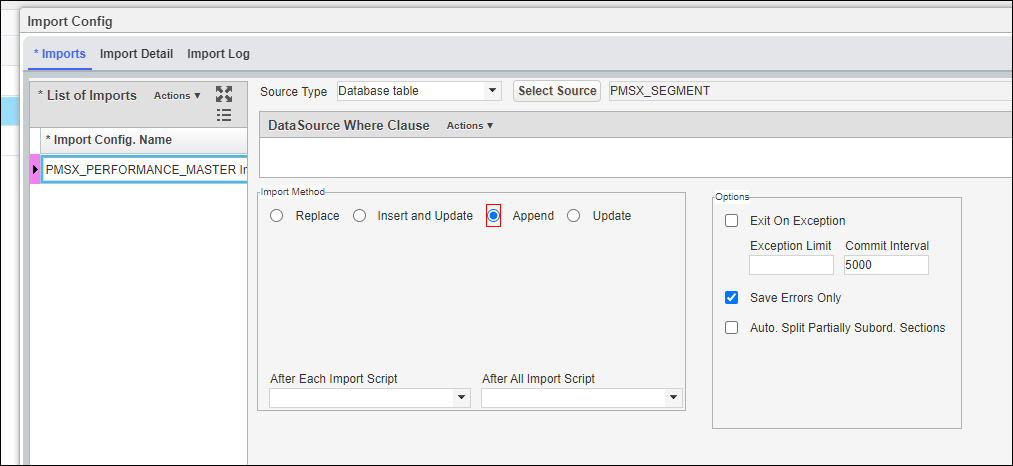
- Right click PMSX_PERFORMANCE_MASTER Import, and select Edit Config.
- In the pop-up window, if you haven't populated this year Performance Master, select Append radio button under Import Method:
If you have already populated this year's Performance Master and want to re-populate it, select Replace radio button under Import Method, and update the Replace Where Clause: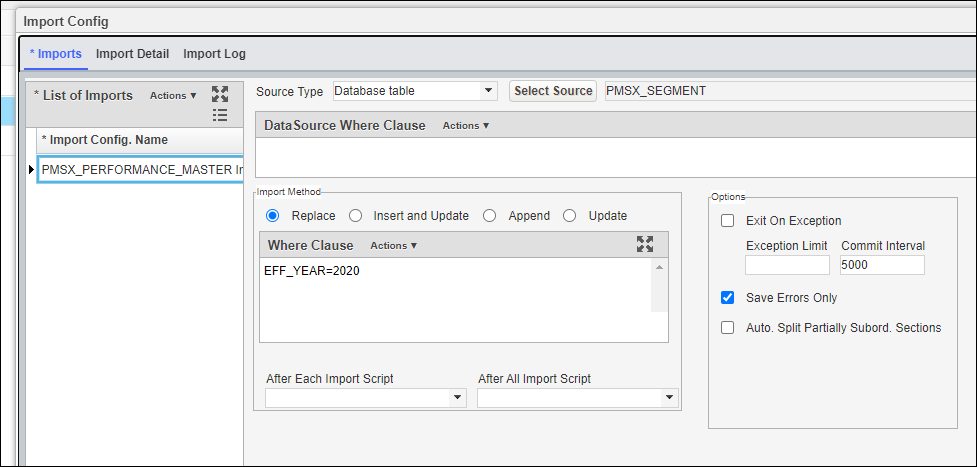
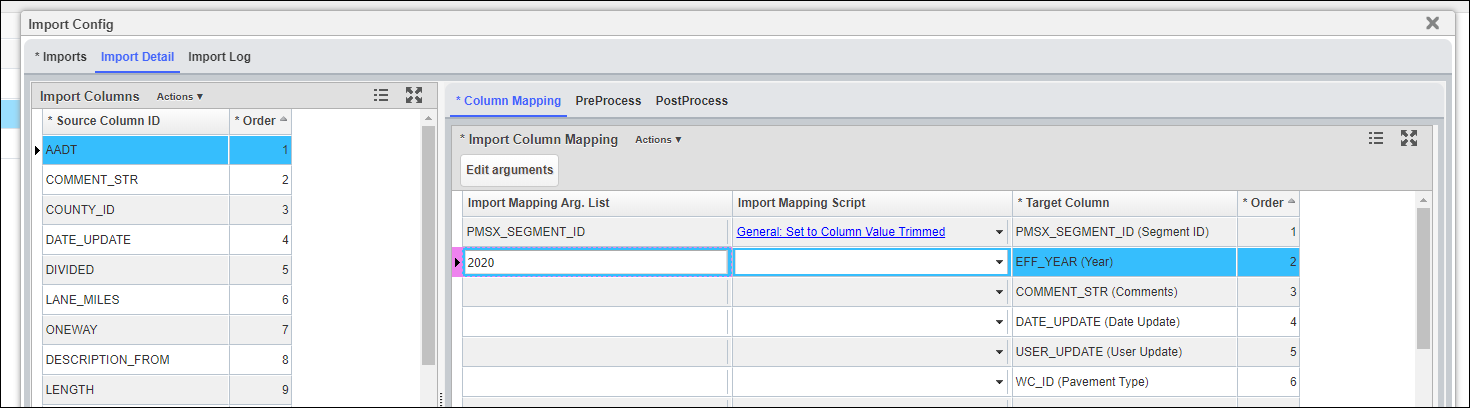
- Then Click Import Details Tab, and update EFF_YEAR column's argument to be the new Performance Master year.
- Click Save button to save the change, and close the pop-up window.
- Navigate to the System Job Schedule window by selecting System from the module menu, then click Tools, then click System Job, and select Schedules. Execute system job named Pavement Express: Create and Update Performance Master.